Adventure System
Role Skills
These sections will describe the specific skills for that roll and how to use them.
Role Die Challenges
Role Die Challenges are mini-games designed to use the player character’s skills in a more dynamic way than the single, binary Skill Checks.
Athlete
Athlete Skills
An Athlete has honed their body to be in peak physical condition. They are able to move across various types of terrain and leap over some obstacles. Athletes handle the "adventurous" portions of Field Operations and often save other members of the party from hazards.
Acrobatics
Characters use Acrobatics for running, sprinting, tumbling and zero-g maneuvering.
Main Attribute: Agility
Athletics
Characters roll their Athletics for jumping, climbing, swimming and feats of strength.
Main Attribute: Strength
Athlete Chase / Race Challenge
Race/Chase Die
|
Roll |
Meaning |
Symbol |
|
1 |
Dash |
|
|
2 |
Dash |
|
|
3 |
Dash Dash |
|
|
4 |
Obstacle |
|
|
5 |
Risk |
|
|
6 |
Competitor |
|
|
7 |
Shortcut |
|
|
8 |
Interference |
|





Overview
The Athlete is either chasing or being chased. Each Round the player and other characters take turns trying to outpace each other, or interfere with each other to slow their opponents down.
Player Goal(s)
Race Objective
- To win by being the first to get to the Goal Marker
Chase Objective
- To catch up to the fleeing character before they reach the Goal Marker
Fleeing Objective
- To get to the Goal Maker before another character catches up (and captures them).
Player Actions
Dash
The Athlete uses their Action to attempt to make Progress towards the goal. They roll the Challenge Die and move a number of spaces, based on the Challenge Die result:
- Dash: 1 or 2
- Obstacle: 0 or 1
- Risk: -1, -2 or 2
- Shortcut: 3, 1 or -1
- Competitor: 1
- Interference: 1 or 0
Double Dash
The Athlete can spend 1 Motivation to roll the Challenge Die a second time for the same Round. This can only happen once per Round.
Interfere
The Athlete uses their Action to interfere with a Competitor. They can perform any other Action that they can normally perform in Combat, given their current context (i.e. can’t fire a spaceship weapon if they're on foot). This is often to attack a Competitor with a Weapon or Grapple, but can also be to create an Obstacle for the NPC.
Dash and Interfere
The only way that a Athlete can both attempt to make Progress (i.e. Dash) and cause Interference to their Competitors (i.e. Interfere) is to spend 1 Motivation. Otherwise the Athlete must choose one or the other Action.
Rest
The Athlete rests and recovers from all Stress or heals 2 Hit Points.
Die Results
Dash
The Athlete makes additional Progress toward their goal, moving forward 1 or 2 spaces.
Obstacle
The Athlete must overcome an obstacle while racing/chasing. If they succeed, they make 1 Progress. If the Athlete chooses to go around the Obstacle, they waste the turn and make no progress.
If they challenge the Obstacle and fail, they waste the turn and do not progress, and in addition may be harmed by their interaction with the Obstacle.
Typically this will be a physical obstacle to overcome. The Athlete can choose whether to use Athletics (and Strength) or Acrobatics (and Agility) to get past the Obstacle. The Athlete doesn’t know what the difficulty will be for each, but they will know what they are stronger with. These are also Skill Checks, so standard rules of using Focus Results and Critical Hit Results apply.
They also may have a sense of the consequences of failing, based on the type of Obstacle. The GM will determine the difficulty for bypassing the obstacle either by consulting the Scenario, or by rolling a 1d4 and using that number as the Obstacle Attack dice pool (Red Attack Dice). The Athlete rolls Green Defense Dice, any uncanceled Hits are damage done to the Athlete.
Risk
The Athlete comes upon a risky maneuver. They can choose to take the Risk, or to lose Progress and go around. If the Athlete takes the risk, they must roll their Acrobatics or Athletics to successfully perform the risky maneuver. If they succeed, they gain 1 Progress and each Competitor loses 1 Progress. If the Athlete fails, they suffer 1d4 damage and lose 2 Progress.
Shortcut
A dangerous gamble in what looks to be a good Shortcut. If the Shortcut works, the Athlete will make 3 progress. The Athlete can also ignore the Shortcut and make 1 Progress.
However, if the Shortcut fails, the Athlete loses 1 progress.
To determine the outcome, the GM rolls a 1d4. This is the Difficulty in an Intelligence or Perception roll that the Athlete must succeed in, in order to correctly utilize the Shortcut. The Athlete cannot know what the difficulty is until after they’ve rolled for the Shortcut. If the number of rolled Hits is equal to or greater than the GM’s roll, the Shortcut is successful.
Competitor
An additional Competitor appears, they will start at the same level of progress as the fastest existing Competitor. When a new Competitor appears, the Athlete proceeds as normal with a Progress of 1.
Interference
A Competitor has attempted to Interfere with the Athlete. This is usually in the form of an Attack. The Athlete can use their Passive Defense for this, but can also spend 1 Motivation to use any Active Defense.
Additional Rules
Starting Position
Race:
In a Race, the Athlete begins with a starting position equal to their Movement.
Chase:
In a Chase, the Athlete and their nearest competitor start 3 paces away from each other.
NPC Movement
Each round the Gamemaster rolls a single Attack Die for each NPC Competitor. On a Hit, the NPC makes 1 Progress. On a Critical Hit, the NPC makes 2 Progress. For any other result, the NPC makes 0 Progress.
The GM can decide which result applies to which Competitor. So if the dice ends up with a Hit a Blank, an Focus and a Critical Hit, the GM can apply the 2 Progress from the Critical Hit to the closest Competitor and the Blank/Focus to the furthest Competitors.
If the PC has used an Action to Interfere with one of the Competitors and it’s successful (i.e. the attack hits), that Competitor (and only that Competitor) makes 0 Progress for that Round.
Vehicle Race/Chase Variant
A Variant of this system can be made with Vehicles instead of a foot race/chase. When using this variant the Obstacle can be avoided via Piloting (Evasion) or Piloting (Ramming). The former gives the vehicle 1 Stress, the latter does the vehicle damage. The vehicle additionally takes a number of damage from an Interference and 1 Stress from the “Double Dash” maneuver. This stress is applied directly to the Vehicle’s Stress Taken, potentially causing the ship to suffer System Damage for avoiding obstacles.
Comms Operator
While anyone can answer a hail, the Communications officer has been specially trained in understanding both the Language and the Etiquette of hundreds of alien species. Even with that training, there are thousands of different dialects in the galaxy, and so a ship’s Communications Station may be augmented with a Protocol Droid or a Language database.
Comms Skills
Etiquette
The Etiquette skill is rolled when it’s not clear what the right way to interact with a creature is. This skill represents training in detecting body language, facial expression, tone of voice, and perceived differences in social status when addressing one of an alien culture. The difficulty is often based on how remote the species is from the mainstream, how far the creature is from humans, or how subtle the interaction is.
Main Attribute: Perception
Languages
The Languages skill is rolled when a character needs to speak to another creature in an alien language or dialect. The difficulty is often similar to the Etiquette roll, but can be augmented more easily through technology. Often both Etiquette and Language will need to be rolled for a new encounter.
If a character passes their Etiquette roll but fails their Language roll, they did the right things, but they failed to communicate. The target’s Disposition and Mood have likely not been damaged by the interchange, but one or both parties doesn’t fully understand what each other said.
If a character passes their Language roll but fails their Etiquette roll, then both parties understand what each other said, but the Communications officer may have made a subtle faux paus, which may alter the alien’s Mood or Deposition in a negative way.
Main Attribute: Intelligence
Comms Challenge
Communication / Etiquette Challenge Die
|
Roll |
Meaning |
Symbol |
|
1 |
Communicate |
|
|
2 |
Communicate |
|
|
3 |
Communicate Communicate |
|
|
4 |
Smiles |
|
|
5 |
Frowns |
|
|
6 |
Soft Eyes |
|
|
7 |
Eyes Widen |
|
|
8 |
No Expression |
|






Overview
The Communication challenge involves social interaction with creatures that may not fully understand you. The players attempt to converse with an alien NPC. Each “Communication” result indicates a normal communication between the PC and NPC. The “Expressions” represent a miscommunication, but the PC only has the expression to provide some context clues as to how.
PCs can save the “Communication” points to either deal with a potential Faux Paus, or to reduce the difficulty of a final roll.
When the PCs feel that they have made a mistake due to a change in the NPC’s behavior, they can attempt to smooth things over by spending the Communication Points accumulated, or they can try to figure out what happened and respond to that. This may call for a secondary roll of a skill to determine if the PC can use their ability effectively.
Player Goal(s)
- The Comms Operator wants to Communicate without offending the alien.
- The Comms Operator wins if they effectively communicate their ideas and concepts without offending the aliens.
- If the Comms Operator figures out the Emotion to Expression mapping for the species (and it’s not the default, #1) they win.
Player Actions
Social Interactions
Die Results
Communicate
The Comms Operator is able to effectively communicate with the alien.
Smiles
The alien expresses “Smile” which may or may not mean that they’re happy.
Frowns
The alien expresses a “Frown”, which may mean they are angry, upset, or not.
Soft Eyes
The alien’s expression “Softens”, which could mean tenderness, sadness.
Eyes Widen
The alien’s eyes widen, which may mean they are surprised.
No Expression
The alien’s expression cannot be interpreted at all.
Additional Rules
The Comms Officer rolls their Languages skill to communicate. The more Hits they get, the more correct their understanding of the alien expressions are. Etiquette is rolled to interpret the results if the Comms Officer feels like they are not getting the responses they expect.
The Scenario Designer can predetermine what certain expressions mean for the NPC. A smile could be a bad indicator, and a frown a good indicator. The Scenario Designer will include possible interpretations for these Expressions for the major NPCs in the scenario.
These various expressions give the PCs a sense of what the NPC is feeling, however, without the Telepathy powers, they are only a surface indicator and may be subject to deception or cross-cultural misunderstanding.
The “No Expression” is the hardest one, it means that the PC was not able to figure out even a glimmer of the NPC’s feeling. The PC can try to roll Insight to figure out what the NPC might be feeling, but the GM will not tell them if they succeed or fail, only what they guess.
The GM uses these “Expressions” as queues for when the NPC changes tactics. The NPCs all have their own goals and will attempt to either manipulate the PCs or force them to leave them alone. So when the PC makes a statement and rolls an Expression, the GM can decide that the NPC has shifted to a different tactic.
Alien Expression Mapping
|
Roll |
Happy |
Angry |
Sad |
Surprised |
No Expression |
|
1 |
|
|
|
|
|
|
2 |
|
|
|
|
|
|
3 |
|
|
|
|
|
|
4 |
|
|
|
|
|
|
5 |
|
|
|
|
|
Speech Challenge Die
|
Roll |
Meaning |
Symbol |
|
1 |
Progress |
|
|
2 |
Progress |
|
|
3 |
Progress Progress |
|
|
4 |
Social |
|
|
5 |
Military |
|
|
6 |
Economic |
|
|
7 |
Religious |
|
|
8 |
Political |
|






Overview
The Commander takes a risk by spending all their Current Motivation (minimum 3) to give a motivational speech to their comrades. If they succeed, they earn back some of their Motivation and each comrade can receive 1-2 Motivation.
Player Goal(s)
- To give a motivational speech to inspire the crew
- The Commander wins if at least 1 character votes positive for part of their speech.
- The Commander loses if no characters vote for their speech
- Allies potentially gain Motivation.
Player Actions
Motivational Speaking
The Commander speaks at length about a specific topic (based on the Challenge Die roll) or about whatever they feel like talking about.
Die Results
Progress
The Commander can talk about anything they please. If the roll is Progress x2, then this counts as 2 rolls for the purposes of meeting the minimum speech length.
Social
The Commander can talk about the social benefits of what the party is doing, either as rewards for their behavior (fame and glory) or the benefit to society as a whole (children won’t go hungry). This is an Optional Topic.
Military
The Commander can talk about the military aspects of their endeavor, how they are strong and have heart, or the tactical advantages they have, or how their enemy is weak. As long as it’s about the upcoming combat or the military in general. This is an Optional Topic.
Economic
The Commander can talk about the economic benefits of what the party is doing or will do. This could be direct rewards that the party will reap economically (we’ll totally plunder them, or we’ll get that raise for sure), or it could be speaking to the larger economic prosperity that will result because of the party’s actions. This is an Optional Topic.
Religious
The Commander can speak to the religious elements or philosophical meaning behind what the party is doing. Perhaps the gods will be pleased with them. Maybe they will be rewarded in the afterlife. Maybe what the party is doing is vitally important for the concept of freedom or justice. This is an Optional Topic.
Political
The Commander can explain the political ramifications of what the party plans to do, and how the shape of power in the world will be altered. The Commander can explain just how important their actions are for the self-governance of the galaxy, or how they will defeat the vile and cleanse the corrupt. This is an Optional Topic.
Additional Rules
Speechifying
As an Extended Action (2+ Turns), the Commander spends all of their Motivation and begins to give a Motivational Speech. Each Turn the Commander rolls the Motivational Challenge die and talks about that topic (see Die Results above).
It may make more sense for the Commander to make multiple Challenge Die rolls and mark down the topics that they need to include before they start their speech.
The number of times they have to roll is based on a simple formula:
- Challenge Difficulty
- 7 - Coordination Skill
If the Challenge Die lands on Progress, the Commander can talk about anything (2x Progress counts as 2 Die Rolls).
If the Challenge Die lands on anything else, the Commander can optionally talk about that subject. If they do, they gain a bonus later.
Once the Commander finishes all of the rolls, they must wrap up their speech.
Voting
Each PC ally gets 1 Vote token. The GM can also get 1 vote token per NPC ally present if they wish. The GM can decide that not all NPCs are participating in the Speech Challenge to change the potential benefits received (see below).
The allies can give their vote token to the Commander during their Motivational Speech, if and when they think the commander did a good job being inspirational.
If the speech ends with no votes being cast for any part of the Motivational Speech, the Challenge ends in a Failure.
If the Commander receives at least 1 vote for any section, the Challenge becomes a Partial Success.
If the Commander gets all vote tokens from all allies, the Command Challenge is a Complete Success.
Benefits
Failures
When the Motivational Speech is a Failure, no one receives any benefits. The Commander does not gain any Motivation from this.
Partial Success
For a Partial Success, each ally who hears the speech gains +1 Motivation.
In addition, the Commander gains 1 Motivation for each Vote Token they received.
Complete Success
When the Motivational Speech is a complete success, each ally who hears the speech gains +2 Motivation.
In addition, the Commander gains Motivation equal to the number of vote tokens they received.
Optional Topics Bonus
If the Commander talks about every one of the Optional Topics that were rolled in their Motivational Speech, they gain 1 additional Motivation.
Alternate Rules (Negotiation Challenge)
In this social challenge, one NPC is the “Decision Maker” and at least one other is the “Rival”. There is a set of “Scales” which contains Progress points for both the PCs and the rival. The challenge consists of multiple rounds, enough to cause the Decision Maker to reach a decision based on which of the two sides of the Scales have more progress.
The Challenge Die has several sides, three of which correspond to simple “Progress” in convincing the Decision Maker.
The amount of progress is based on the type of argument (Logic, Deception, Intimidation, Charm, Negotiation, etc) and the character’s Attribute + Skill for that type of argument.
If the challenge die lands on a “Progress” side, the GM adds counters to that side of the scale equal to half of the Attribute + Skill total for that character and that type of argument. A very good argument by the PC can effectively double the points for that argument.
The Decision Maker has both a Threshold, and a Round Limit. If one side’s Progress equals or exceeds the Threshold, then the Decision Maker chooses that side. Otherwise the Decision Maker will make a choice at the end of the Round Limit based on which side has more Progress.
The GM rolls the Challenge Die for the Rival. The player rolls the challenge die for their character.
The other sides of the challenge die represent the Decision Maker wanting the two sides to speak to that aspect of their argument. If the PC debater can switch topics and adequately address this facet of the debate, they can earn extra Progress points, otherwise they lose Progress points.
Subtopics involve the player character making an argument, and if the argument is good, the GM can award them bonus dice. Then the PC and the Rival both do a Skill Check, and the one with the higher result “wins” and gains the points for that Subtopic.
On each of the player character’s turns, they can either make a new argument or refute the argument of their Rival. This dictates how the Progress is tallied. If it’s a refutation, points are removed from the opponent’s side. It’s a new argument, points may be made on their side. The first person to speak on one of the five other subtopics is assumed to be making a new argument, and the second is assumed to be refuting that argument, but that may not always be the case. It’s possible to make two separate, new arguments on the same subtopic.
If one of these Subtopics is rolled during the Rival’s turn, it can mean that the Rival has brought up this new topic.
The Scenario Designer can come up with the main NPC Rival’s arguments, as well as specific subtopic arguments they make. They can also determine what questions the Decision Maker asks on the main topic, as well as the subtopics. They should also come up with a list of “forbidden” topics or arguments, that if the PCs bring up, may cost them Progress Points.
The Debate Challenge Die can also be used for Negotiation challenges, but in that case there is only 1 other party, and that party will ask for additional concessions related to either Social, Military, Economic, Religious or Political realms to make the deal complete.
Engineering
Most ships benefit from having someone in the Engineering role. Additionally, there is often an Engineering section of the ship, which gives the Engineer access to the power controls and some automated repair systems. If a ship doesn’t have an onboard Engineer, its other stations may end up functioning poorly or not at all until the ship can be worked on at a space station or planet-side spacedock.
Engineering Skills
Mechanics
The Mechanics skill gives the character in the engineering station the ability to create new devices. These devices can be weapons, armor or other gadgets. If the engineer has a blueprint for these, or another device to reverse-engineer, they can create a new copy of the device.
The engineer can also route power around a spaceship. The Mechanics skill allows additional dice to be shifted around from station to station, providing a needed boost during critical situations. Power systems are in a variety of other vehicles and devices, from huge planetary shield generators, to little pocket glow sticks. These power systems can also be modified to provide extra dice, or even overloaded to cause them to explode.
Main Attribute: Intelligence
Repair
The engineer can make quick repairs of technological devices using the Repair skill. The Repair skill can also heal the Hit Points of Droids, much like the First Aid skill for living beings. This is critical on a spaceship, but quite handy for any type of vehicle or device. Some devices have a binary “working / broken” dichotomy, however things like spaceships have Hull Points which can be restored, one per Success rolled.
Main Attribute: Deftness
Engineering Challenge
The Engineering Challenge is rolled when a Mechanic needs to create a device (Mechanics) or quickly repair it (Repair) under difficult circumstances. This would either be when the Mechanic has little time, or when they do not have unlimited Power. In all other cases, the Mechanic can create a device with a simple skill check roll. Fixing devices when the Mechanic has time also requires just a simple Repair skill check roll. If the character has the Engineer class they can also disassemble a device without rolling, and create new devices without blueprints.
Create / Repair Challenge Die
|
Roll |
Meaning |
Symbol |
|
1 |
Progress |
|
|
2 |
Progress |
|
|
3 |
Progress Progress |
|
|
4 |
Insufficient Power |
|
|
5 |
Faulty Wiring |
|
|
6 |
Inspiration |
|
|
7 |
Missing Parts |
|
|
8 |
Instability |
|






Overview
To build or repair a device by managing power and utilizing it well. To fix things in the field, the Mechanic may have to carry Power Packs, which are used up. On a ship, some of the generated power has to go towards the repairs.
Player Goal(s)
- To repair a device either quickly, efficiently or well.
- If the device explodes, the Mechanic fails the Engineering Repair Challenge.
- If the Mechanic is KO’ed by Electrical or Explosion damage, they fail the Repair Challenge.
- If the Mechanic repairs the device, it is considered a success.
- To build a new device either quickly, efficiently or well.
- If the device explodes, the Mechanic fails the Engineering Build Challenge.
- If the Mechanic is KO’ed by Electrical or Explosion damage, they fail the build Challenge.
- If the Mechanic builds the device, it is considered a success.
Player Actions
Fabricate
This Action converts Power into Progress. A machine needs a certain amount of Progress to be completed.
Repair
This Action converts Power into the repair of a system. Required to eliminate flaws in the device. This requires a Repair check where the difficulty is based on the complexity of the device (it’s Rarity level).
Replenish
If the Mechanic is in a place which has access to a Power Generator (starship, base), they can spend an Action and roll their Mechanics skill, potentially replenishing Power for use to build or repair some device.
Die Results
Progress
The Mechanic makes extra Progress without requiring Power.
Insufficient Power
The device being made/repaired requires lots of Power, and will only be solved if the Mechanic pumps X raw more Power into it.
Faulty Wiring
The device is leaking Power, to fix this requires a Mechanics check and will cause 1 die of Electrical/Ionic damage to the Mechanic per raw Power that has been put into the device.
If this is not fixed it gives the device a 25% chance to Explode (cumulative) when used.
Inspiration
The Mechanic has a brilliant idea that can make the device work better (+1 die bonus), but it requires sacrificing N amount of Progress to do so (the Mechanic has to undo some work).
Missing Parts
The Mechanic has realized that some required parts are missing. They can solve this issue by spending some Parts (see the Engineer class), which can be expensive.
If this is not fixed it gives the device a 25% chance to Explode (cumulative) when used.
Instability
The device has become Unstable and could potentially Explode, however only with a 25% chance when the device is used (cumulative). To repair this the Mechanic has to use M Power with the Repair action.
Additional Rules
Shipboard Power
At the beginning of the challenge, the Mechanic rolls their Mechanics skill and generates Power Tokens equal to the number of Hits rolled (Critical Hits count as 2 Hits). Then over each subsequent turn the Mechanic rolls the Challenge die and either consumes Power, replenishes Power, or repairs a system.
Portable Power
If the Mechanic is in the field and does not have access to a Power Generator, they must make due with a Power Recharger. This is the only portable device that can provide enough Power for this type of mechanical work. Each Power Recharger holds 10 Power for use with this Challenge (it can recharge Energy Cells and Power Packs 100 times, but those are not attempting to fabricate new devices).
Power Rechargers can be recharged at a Power Generator.
Progress Requirements
The complexity (i.e. Rarity) of a device determines how many Progress are required to repair or create it.
|
Device Rarity |
Progress to Repair |
Progress to Create |
|
Common |
3 |
6 |
|
Uncommon |
5 |
8 |
|
Rare |
7 |
10 |
|
Very Rare |
9 |
12 |
Guard
The Guard role is for the character that is trying to protect the main party from danger. Guards can also be protecting specific characters or items. Guards are trained to be alert to incursions and to be able to quickly respond physically. If the party is set upon by an enemy, the Guard gets one free Standard Action they can use before Initiative is even rolled. This can be critical to hide or protect a single character or item.
If there is no one in the Guard role, the party just rolls Initiative upon an enemy incursion.
Guard Skills
Alertness
Characters roll their Alertness to attempt to notice something sneaking around or something suddenly coming into view. It is also used to determine Combat Initiative and to see who goes first in a duel.
Main Attribute: Perception
Resistance
A Guard's Resistance skill is used to resist sleep, intoxication and drugs, poisons and environmental extremes.
Main Attribute: Toughness
Guard Challenge
Guard Challenge Die
|
Roll |
Meaning |
Symbol |
|
1 |
Time Passes |
|
|
2 |
Time Passes |
|
|
3 |
Time Passes Time Passes |
|
|
4 |
Notice (Gain +1 Initiative Token) |
|
|
5 |
Notice (Gain +1 Initiative Token) |
|
|
6 |
Sleepy (Resistance) |
|
|
7 |
Distracted (Alertness) |
|
|
8 |
Encounter |
|





Initiative Token

The Initiative Token is earned from the Notice Challenge Die Result. It can be given to other characters within Medium Range. If an Encounter starts within 10 minutes, characters can exchange Initiative Tokens for extra dice to roll for Initiative.
Overview
The challenge for the Guard is to stay awake and alert while being constantly distracted. The Guard must prioritize who should receive Initiative Tokens and whether to try to trigger the Encounter early or try to hope that it doesn’t happen.
(Should I change this to Focus Tokens?)
Player Goal(s)
- To intercept the Encounter before it is ready (gain 5+ Clues).
- To help the part be as prepared as possible for an Encounter (gain X Initiative Bonus Tokens)
Player Actions
Rest
The Guard Rests, recovering from 1 Stress.
Observe
The Guard actively Observes their surroundings. If the next roll is an Encounter, the Guard will gain +1 Initiative for it. This bonus can stack with other Initiative Bonuses, but it is not cumulative.
Patrol
The Guard goes on Patrol. This inflicts 1 Stress. While on Patrol the Guard gains 1 Free Movement Action if the next roll is an Encounter.
Search
The Guard Searches the area. This inflicts 2 Stress. While Searching the Guard gains 1 Free Action if the next roll is an Encounter.
Die Results
Time Passes
Nothing happens, this is both a good result and a bad result as it passes the time for the Guard challenge without providing any benefits.
Notice
The Guard is alerted to possible danger and gains +1 Initiative Token, which they can keep or give to another PC that is nearby (within Medium Range).
If the Guard is Observing, they gain 1 Clue.
If the Guard is Patrolling, they gain 2 Clues.
If the Guard is Searching, they gain 3 Clues.
Example Clues
|
Roll |
Example Clue |
|
1 |
Footprints on the ground |
|
2 |
A broken branch or piece of trash |
|
3 |
A faint sound nearby |
|
4 |
The glint of reflected light |
|
5 |
Movement at the periphery |
|
6 |
A strange smell |
Sleepy
The Guard is tempted with Sleep. They must make a choice about whether to give in or resist.
Option 1: Give In
Sacrifice 1 Initiative Token and Recover from all Stress (nod off).
Option 2: Resist
Suffer 1 Stress and roll Resistance (to stay awake), failure and the Guard falls asleep anyway, losing 2 Initiative Tokens.
Distraction
The Guard is tempted with Distraction and may lose all Initiative Tokens.
Option 1: Concentrate
Can Suffer 1 Stress to keep all bonus Initiative Tokens that the Guard has on them.
Option 2: Investigate
Can roll Alertness against a difficulty based on the number of Initiative Tokens obtained to retain them, but if they fail they will suffer 2 Stress and lose all Initiative Tokens.
Encounter
An unavoidable Encounter, the Guard may use any Initiative Bonuses that they’ve earned from their Actions on this Encounter:
- Last Action was Observe: Gain +1 Initiative Bonus Die
- Last Action was Patrol: Gain 1 Movement Action
- Last Action was Search: Gain 1 Standard Action
- Any retained Initiative Tokens: Gain +1 Initiative Bonus Die
Any unused bonuses will be lost after the Encounter.
Additional Rules
There are two separate counters for the Guard Challenge:
- Guard Time: The amount of time that the Guard has to patrol for. If this time is exceeded by “Time Passes” without an Encounter, then nothing happens.
- Clues to Find: The number of Clues that the Guard must find in order to get the drop on the Encounter. If the Guard finds Clues equal to or greater than the Clue Threshold, then the Guard spots the Encounter first, and can decide how to engage in it.
The Guard also manages the Initiative for the group, gaining Initiative Tokens that they can grant to allies or themselves.
One of the reasons that this mini-game is simpler is because the Guard can take a turn each round of Wilderness Survival, Investigation or as a standalone minigame. To this end the “Encounter” can actually be an Encounter rolled on one of these other Challenge Dice.
Helm
The person at the Helm is ostensibly the pilot of the ship. Though some ships have an autopilot, this is one of the single most important roles on board, as the ship can’t get anywhere if no one is piloting it.
Helm Skills
Piloting
The Helm uses the Piloting skill to maneuver a vehicle through normal space. This skill can be used for land, water, air or space vehicles. Each vehicle may have a Maneuverability Modifier. This modifier adds to, or in rare cases subtracts from, the overall Piloting difficulty. Most piloting actions are Easy (2), while the Special Maneuvers of the Ace have higher difficulties (until those Maneuvers are mastered). This combination can sometimes generate very difficult, or even Impossible maneuvers.
Main Attribute: Deftness
Navigation
The Navigation skill is used to plot routes through hyperspace, across a local system, and from one place to another on a planetoid. A character at the Helm must roll this even if there is also a navi-computer or maps.
Astrogation: The difficulty of this roll is based on the difficulty of the jump. Jumps far away from gravitational sources along well-mapped hyperspace lanes are a low difficulty, while those jumps closer to gravitation or along poorly or uncharted areas are more difficult. A ship’s navi-computer can add additional bonus dice or potentially reduce the difficulty for some jumps.
Ground Orienteering: The difficulty for this is based on the terrain, weather and time of day. Things that obscure where the characters have gone and where they want to go.
Main Attribute: Intelligence
Helm Challenge
Vehicle Evasion Challenge Die
|
Roll |
Meaning |
Symbol |
|
1 |
Navigation Checkpoint |
|
|
2 |
Navigation Checkpoint |
|
|
3 |
Obstacle (Stationary) |
|
|
4 |
Obstacle (Stationary) |
|
|
5 |
Intercepting (Starboard) |
|
|
6 |
Intercepting (Port) |
|
|
7 |
Incoming (Fore) |
|
|
8 |
Pursuing (Aft) |
|




Overview
The Helm Challenge is a piloting test, where obstacles and enemies may come at the pilot from different directions, and they have to choose what speed to travel in, as well as when to turn.
Player Goal(s)
- To survive the encounter with minimal damage taken.
- To hit the required number of Navigation Checkpoints needed to Escape from the Helm Challenge.
Player Actions
Each Round the Pilot gets a Turn with 1 Action. The Pilot can spend 1 Motivation to take a Second Action in a single Turn. A Co-Pilot can also take any Pilot Action, but the vehicle can only be maneuvered once per Turn. A Gunner can Rotate a Turret or Fire a Weapon.
Increase Speed
The Pilot increases the vehicle’s Current Speed by 1, to a maximum of the vehicle’s Maximum Speed.
A vehicle’s Current Speed affects various other Actions.
A vehicle has a special Cruising Speed which is equal to half of its Maximum Speed, rounded up.
Decrease Speed
The Pilot decreases the vehicle’s Current Speed by 1, to a minimum of 1.
If a vehicle is traveling less than its Cruising Speed, it recovers from 1 Stress per Turn.
Turn
The Pilot turns their vehicle towards or away from an obstacle or attacker. The Turn Action potentially affects the vehicle’s Passive Defense and ability to Attack:
- If the vehicle is facing towards the target, it can use its Primary Weapon to attack.
- If the vehicle is facing away from the target, its Passive Defense is bolstered by its Current Speed.
However, a vehicle will suffer 1 Stress if it takes the Turn Action and its Current Speed is higher than its Cruising Speed.
Dodge
The Pilot rolls their vehicle’s Dodge Rating to avoid the obstacle or attack. Dodge Rating is based on Passive Defense and Pilot skill.
- Passive Defense
- Armor Rating +- Maneuverability
- Vehicle Dodge
- Pilot (skill) + Default Defense
Without using the Dodge action, the vehicle defends with its Passive Defense (see Turn).
Attack
If the obstacle or attacker is within the vehicle’s Primary Weapon Arc (usually the Forward Firing Arc), the Pilot can fire the vehicle’s Primary Weapon (if it has one).
The Pilot rolls their vehicle’s weapon’s damage (plus their Deftness if they are Proficient) as Red Attack Dice against the target.
The target’s defense varies based on what it is:
- Obstacle: The defense dice pool is equal to the Pilot’s vehicle’s Current Speed.
- Attacker: The defense dice pool is equal to the attacker’s Passive Defense.
Each uncancelled Hit does 1 damage to the target. Critical Hits count as 2 Hits to enemy targets, but as Critical Damage to the Pilot’s vehicle. If the target suffers more damage than it has Hull Points (or Durability in the case of Obstacles), it is destroyed and no longer poses a threat.
Rotate Turret
If the vehicle has a Turret, it can be rotated to a different Firing Arc (Fore, Aft, Port or Starboard) as an Action.
Navigate
The Pilot can perform a Navigation check (Intelligence + Navigation) to reduce the number of Navigation Checkpoints the Pilot must fly to before the Challenge is complete. This roll cannot reduce the required checkpoints below 1.
Die Results
Navigation Checkpoint
The Pilot has come across a Navigation Checkpoint. These orient the Pilot and help end the Helm Challenge.
Obstacle
An Obstacle has appeared directly ahead of the Pilot’s vehicle. The Pilot must choose whether to Dodge, Turn or Reduce Speed to avoid the Obstacle, or risk the ship taking damage.
The Obstacle’s Attack Dice Pool is based on the Pilot’s vehicle’s Speed.
The Obstacle’s Defense Dice Pool is based on the Pilot’s vehicle’s Speed.
Intercepting (Starboard)
An Attacker (or moving Obstacle) is coming in from the Starboard Side. The Pilot must choose whether to Dodge, Turn or Reduce Speed to avoid the Attacker, or risk the ship taking damage.
If the Intercepting thing is an Attacker, it has Offense and Defense stats based on the vehicle type and pilot skill.
If the Pilot’s vehicle stays in the same orientation, it cannot attack, and it also does not gain any bonus dice to its defense.
Intercepting (Port)
An Attacker (or moving Obstacle) is coming in from the Port Side. The Pilot must choose whether to Dodge, Turn or Reduce Speed to avoid the Attacker, or risk the ship taking damage.
If the Intercepting thing is an Attacker, it has Offense and Defense stats based on the vehicle type and pilot skill.
If the Pilot’s vehicle stays in the same orientation, it cannot attack, and it also does not gain any bonus dice to its defense.
Incoming (Fore)
An Attacker (or moving Obstacle) is coming in from the Fore (directly ahead). The Pilot must choose whether to Dodge, Turn or Reduce Speed to avoid the Attacker, or risk the ship taking damage.
By default the Pilot’s vehicle can probably attack an Incoming ship, as it’s Primary Weapon is facing in the same direction (Fire Arc Forward).
Pursuing (Aft)
An Attacker (or moving Obstacle) is coming in from the Aft (directly behind). The Pilot must choose whether to Dodge, Turn or Increase Speed to avoid the Attacker, or risk the ship taking damage.
By default the Pilot’s Passive Defense is bolstered by their current Speed, making them harder to hit as they rapidly flee.
Additional Rules
Starting Speed
At the beginning of the Helm Challenge, the Pilot can set their vehicle’s Current Speed to any whole number between 1 and their vehicle’s Maximum Speed.
Current Speed
A vehicle’s Current Speed affects a ship’s Passive Defense, Dodge and Incoming (Fore) and Pursuing (Aft) dice pools.
Cruising Speed
A vehicle has a special Cruising Speed which is equal to half of its Maximum Speed, rounded up.
If a vehicle is traveling above its Cruising Speed and it Turns, it suffers from 1 Stress.
If a vehicle is traveling below its Cruising Speed, it recovers from 1 Stress.
Retreating State
If an Attacker is put into the Retreating State, it cannot attack the vehicle. In addition the vehicle gains a +2 bonus to any attack against that Attacker (cumulative with other bonuses).
Navigation Requirements
Typically the vehicle must meet a Navigation Target to complete the Helm Challenge.
This can be achieved by either passing a Navigation Checkpoint (via a Challenge Die Roll) or performing the Navigate Action and getting Hits.
|
Navigation Target |
Challenge Difficulty |
|
3 |
Very Easy |
|
5 |
Easy |
|
7 |
Intermediate |
|
9 |
Challenging |
|
11 |
Hard |
|
13 |
Very Hard |
Special Maneuvers
The following are the Special Maneuvers that can be learned by the Ace class. On their Turn the Ace can use one of these Maneuvers if they know it.
Koiogran Turn

The Pilot flips their ship around so it is facing 180º from where it started. This flips any Pursuing to be Incoming and vice-versa.
Segnor’s Loop


The Pilot makes a shallow curve to the left or right and then flips their ship to face the opposite direction, changing its facing by 225°. This causes any Intercepting ships to become Incoming or Retreating (pilot’s choice). This will also give the Pilot +2 against a collision with a (stationary) Obstacle.
Tallon Roll


The Pilot makes a tight turn to the left or right and then flips their ship to face the opposite direction, changing it’s facing by 90°/270°. This causes any Intercepting ships to become Incoming or Retreating (pilot’s choice). This will also give the Pilot (or Gunner) +2 for any Primary Weapon attack (Forward Firing Arc).
Full Stop

The Pilot brings their ship to an absolute stop. This will completely prevent collision with a (stationary) Obstacle, and reduce the damage bonus for all Incoming to zero.
Reverse Straight

The Pilot reverses their ship's course without turning. This retains all Attacker/Obstacle orientations, but turns an Incoming attacker’s damage bonus into a defense bonus (for both the ship and the Incoming). This will also completely prevent a collision with a (stationary) Obstacle.
A ship will take 2 Stress from a Reverse Straight unless the previous maneuver was the Full Stop.
Reverse Bank


The Pilot performs a banking maneuver and flips their ship the opposite direction, changing its facing by 45º. This will completely avoid a collision with a (stationary) Obstacle, and give the ship a +2 attack bonus against an Incoming ship. It can also put the ship behind an Intercepting Attacker/Obstacle, putting it into the Retreating state.
Barrel Roll

The Pilot rolls their ship to the left or right. This will completely avoid a collision with a (stationary) Obstacle, and potentially get behind an Intercepting Attacker/Obstacle putting it into the Retreating state.
Boost
The Pilot adds a bit more speed to their ship. This increases its Current Speed by an extra 1. If the ship was already at Maximum Speed, this temporarily increases the ship’s speed by 1 beyond its maximum. If this occurs the Ship suffers 1 Stress. This change in Current Speed will affect all other dice pools of Incoming, Retreating and Pursuing attackers. (See Turn, Dodge and Attack above).


Multiple Pilots
Only 1 Pilot can maneuver each Vehicle, so there are either multiple vehicles being piloted, or there can be a Co-Pilot and any number of Gunners.
The Co-Pilot can perform the Navigate Action.
The Co-Pilot or Gunner can Rotate a Turret and Fire the Weapon(s) so that the main Pilot can concentrate on Maneuvering the ship.
Investigator
The Investigator is the role that is either critical or unnecessary, depending on the specific Operation the team is on. If the team is Investigating or Tracking a mark, the Investigator is able to find clues using their Searching, and put together all the clues with their Deduction to determine where to go next. If there is an Investigator, they are allowed to roll to find clues even if their Passive Search would cause them to miss them.
If there is no Investigator, the party will ignore any clues in the area that are hard to find (e.g. have a difficulty higher than any character’s Passive Search).
Investigator Skills
Deduction
The Deduction skill is rolled to determine if the party has likely found all the clues in the area and is safe to move on to the next area. Deduction is also rolled when the Investigator has collected many clues and is trying to solve the mystery. They say their theory and then roll their Deduction against a difficulty. The difficulty for this mystery solving roll is based on the number of clues found. Fewer clues found increase the difficulty. If the Investigator gets at least 1 success, they gain a binary response from the Gamemaster whether their theory is right or not-right. Additional successes will provide hints from the GM to point the Investigator in the right direction.
If there is no one in the Investigator role, then the mystery will simply be unmanaged and the PCs may not solve it. The Gamemaster should let players know when having a dedicated Investigator would be very valuable.
Main Attribute: Intelligence
Searching
The Searching skill is used to directly find clues in an area. This skill encompasses standard Searching, genetic evidence (blood, hair, skin left at the scene), ballistics (direction of incoming shots, type of wounds, bullet tracing, blaster burn patterns, etc), and general clue finding. Each clue has a difficulty to be found. The Investigator can roll against this difficulty to see if they find a clue. If there is a character in the Investigator Role, then they at least know that there is a clue in the area, even if they can’t find it on the first roll, which can prompt them to change the parameters of their search. Searching is added to Perception to create the Passive Search score.
Main Attribute: Perception
Investigator Challenge
Investigator Challenge Die
|
Roll |
Meaning |
Symbol |
|
1 |
Search (Searching) |
|
|
2 |
Search (Searching) |
|
|
3 |
Search x2 (Searching) |
|
|
4 |
Hint (Deduction) |
|
|
5 |
Obstacle |
|
|
6 |
Obstacle |
|
|
7 |
Busybody |
|
|
8 |
Encounter |
|


Overview
The Investigator hits the streets to search for clues. This is often used for Bounty Hunting to track down where the target is.
Player Goal(s)
- To collect all the Clues possible before the Heat gets too high
- If the Investigator gets all possible Clues, they win.
- If the Investigator gets too much Heat, they will be attacked, which may force them to abandon the investigation, causing them to lose.
Player Actions
Investigate
The Investigator investigates and rolls the Investigation Challenge Die.
This increases the current Heat of the Investigator’s party by 1.
Lay Low
Reduce the Heat of the Investigator’s party by 2.
Die Results
Search
The Investigator accumulates Search Points based on their Perception + Searching (double this total for a Search x2 result). When the current Search Points equal or exceed the Clue Threshold, the Investigator finds a Clue and their Search Points reset to zero.
Hint
If the Investigator rolls a “Hint” result, their character can roll Deduction against the current number of found Clues and the difficulty of the current Mystery. On a success, the Investigator gets a Hint as to where to look next. The Investigator can sacrifice the Hint to gain 1 Motivation.
Obstacle
Obstacles obstruct the Investigation until they are overcome. They will typically be physical or software barriers preventing the PCs from continuing. As such they can (and usually will) spark another mini-game (Athlete, Communication, Lock Picker, Slicer). Sometimes the obstacles are puzzles left by the criminal or ancient culture. These may have to be figured out by the player. The more violently the Investigator choses to bypass an Obstacle, the more Heat they generate.
The most common Obstacle is a Lock (Locked Door or Locked Box).
Busybody
Busybodys represent NPCs which prevent progress but are not overtly hostile, however the way that the Investigator deals with them can increase Heat. On ancient, abandoned worlds, Busybodies might represent minor encounters with surviving wildlife or holographic or psychic ghosts of some kind. Busybodies may also need to be hid from, and so this may spark a Scout or Exfiltration mini-game.
Encounter
The Encounter result represents an unavoidable encounter, but one in which the severity may be related to the amount of Heat that’s been generated by the Investigator and their team so far.
Additional Rules
The Investigation uses two main counters:
- The Clue Threshold: How many Search Points are needed to find the next clue. Search Points are a combination of (Perception + Searching) x Search Result
- Maximum Heat: If the Heat exceeds this threshold, the Investigation Team will be engaged in an Encounter.
Clue Threshold Challenge Level
|
Search Total |
Challenge Difficulty |
|
3 |
Very Easy |
|
5 |
Easy |
|
7 |
Intermediate |
|
9 |
Challenging |
|
11 |
Hard |
|
13 |
Very Hard |
Heat Threshold Table
|
Alertness Level |
Heat Threshold |
|
Sleepy |
5 |
|
Normal |
4 |
|
Alert |
3 |
|
Searching |
2 |
But it’s also related to main Mystery mechanics:
- Clues: These are found at Locations and can be used to solve the Mystery
- Mystery Difficulty: This difficulty is reduced by 1 for each Clue found and can have Deduction rolled against it to determine if all clues have been found yet.
Medic
A ship’s Medical Bay may be outfitted with the latest Bacta tanks and 3D skin printing tech. Or it could just be a bunk in the corner next to a blood transfusion machine. Whatever the case, the Medical skills are usable in any conceivable environment and can also come in handy during an investigation.
Medical Skills
First Aid
The FIrst Aid skill restores Hit Points to a character during combat. As an Action, the medic can roll a dice pool equal to their Intelligence + First Aid skill. Each Hit restores 1 Hit Point. Critical Hits count as two Hits. Restoring Hit Points is very important to keep combatants from suffering more serious injuries.
Main Attribute: Intelligence
Medicine
The Medicine skill is used to help an Injured character recover more quickly. Treating an Injury outside of a damatic event requires a simple roll of the medic's Medicine skill. However, during combat or other dramatic events, the medic must roll the Medical Challenge die to come up with an amount of progress equal to the number of Injuries that the character has. If the results are anything but "progress", this will likely require special medicines, machines or treatments that can take a long time (several hours or even days).
Main Attribute: Intelligence
Medical Challenge
Medical Challenge Die
|
Roll |
Meaning |
Symbol |
|
1 |
Heal |
|
|
2 |
Heal |
|
|
3 |
Heal Heal |
|
|
4 |
Fatigue |
|
|
5 |
Abnormal Temperature |
|
|
6 |
Trouble Breathing |
|
|
7 |
Dizzy or Nauseated |
|
|
8 |
Pain |
|






Overview
The medical challenge results in various symptoms that the patient displays. Each symptom may be caused by several different possible underlying ailments, so it’s up to the doctor to diagnose and treat each one or move past it to solve a different issue.
Player Goal(s)
- To Diagnose the target character’s ailment correctly
- The Medic wins the Diagnosis Challenge if they guess the illness or injury correctly.
- If the Medic guesses incorrectly, they lose the Diagnosis Challenge.
- To make a severely Injured character Stable by responding to their symptoms and restoring their Hit Points.
- If the Medic keeps their patient stable (not hitting zero Hit Points) for N turns, they win and the patient recovers from 1 Injury.
- If the Medic fails to keep their patient stable (they fall to zero Hit Points), the patient falls unconscious and must make a Resistance Check to avoid becoming more Injured. This can potentially kill the patient.
Player Actions: Diagnosis Challenge
Examine
As an Action the Medic performs an Examination, rolls the Challenge Die and may do the following based on the result:
- Heal: Save 1 Diagnosis attempt for the Illness/Injury to be used later
- Potential Symptom: Ask the patient if they are feeling a certain way based on the rolled Potential Symptom
- In universe this corresponds to a peculiar reading that the Medic gets on their medical scan of the patient. As a good Medic, they are attempting to confirm if the Symptom is really a problem.
Diagnose
Then once the Medic feels they have the correct results, they can make a Diagnosis.
The Medic always gets 1 Diagnosis attempt, and gets additional ones for each “Heal” result rolled.
If the Medic’s Diagnosis is right, they win the Challenge. If the Diagnosis is wrong, they’ve failed and the patient may suffer.
Player Actions: Stabilization Challenge
First Aid
Restore Hit Points but make no attempt to cure the patient of their Injury / Illness. This action can only be performed once per Challenge attempt.
Treat
Roll the Challenge Die and deal with the Symptoms that are rolled as they come up. If the Symptom cannot be treated, the patient suffers 1 additional Hit Point loss per Turn. Only 3 medicines can be applied per Challenge.
Die Results
The die results represent symptoms that the patient is suffering from.
For the Diagnosis Challenge, the Medic has to Examine the Patient for Potential Symptoms and guess/Diagnose which illness or injury the target has based on what’s already known. If the same Symptom is rolled two or more times, that represents a mistake made by the Medic, and makes the Challenge harder.
For the Stabilization Challenge, the Medic has to respond to each Symptom in turn, as the character slowly hemorrhages Hit Points. If the same Symptom is rolled two or more times, this represents the Symptom worsening. The Medic may have to use more resources to deal with that Symptom or the patient will lose Hit Points faster.
Heal
For the Diagnosis Challenge, this provides 1 additional Diagnosis Guess per Heal icon.
For the Stabilization Challenge, this result means that the patient has 1-2 Hit Points restored. Since the patient loses 1 Hit Point per turn, this can be helpful to keep them conscious longer and prevents further injuries.
Fatigue
For the Diagnosis Challenge, the patient is suffering from Fatigue and must communicate this to the Medic without using the word “Fatigue”.
For the Stabilization Challenge, the patient’s Fatigue can be partially offset by the Medic administering a stimulant. However only 3 medicines can be applied at one time.
Abnormal Temperature
For the Diagnosis Challenge, the patient is suffering from an Abnormal Temperature (fever and/or chills) and must communicate this to the Medic without using the word “Temperature, Hot or Cold”.
For the Stabilization Challenge, the patient needs to be warmed or cooled appropriately. The Medic may need blankets and ice packs.
Trouble Breathing
For the Diagnosis Challenge, the patient is having Trouble Breathing and must communicate this to the Medic without using the word “Breath”.
For the Stabilization Challenge, the Medic can administer an inhaler to alleviate the patient’s symptoms. However only 3 medicines can be applied at one time. If no medicine is provided, the patient’s Movement and Defenses are all cut in half.
Dizzy or Nauseated
For the Diagnosis Challenge, the patient is Dizzy or Nauseated and must communicate this to the Medic without using the word “Dizzy or Nauseated”.
For the Stabilization Challenge, the Medic can administer an antihistamine to alleviate the patient’s symptoms. However only 3 medicines can be applied at one time. If no medicine is provided, the patient’s Movement and Defenses are all cut in half.
Pain
For the Diagnosis Challenge, the patient is in Pain and must communicate this to the Medic without using the word “Pain”.
For the Stabilization Challenge, the Medic can administer painkillers to alleviate the target’s suffering. However only 3 medicines can be applied at one time. If no medicine is provided, the patient suffers 1 Stress each Round.
Additional Rules
Symptoms to Diseases Diagnosis Mapping
There are a few possible diseases for each set of Symptoms. Each disease or injury has 3 symptoms.
The GM will roll against this table and/or select a disease/injury, then the Medic will roll the die and ask the patient how they’re feeling in relation to the symptom rolled. The patient can look at the Symptoms and can reply, but cannot use the name of any of the symptoms. Once the Doctor has rolled N times, they must guess based on the data they have. For each “Heal” value rolled, they get another 1 Guess.
The number of times rolled equates to the difficulty. Lower numbers of rolls make the game harder.
Diagnosis Difficulty Levels
|
Diagnosis Rolls |
Challenge Difficulty |
|
3 |
Very Hard |
|
4 |
Hard |
|
5 |
Challenging |
|
6 |
Intermediate |
|
7 |
Easy |
|
8 |
Very Easy |
Symptoms to Disease or Injury Table
|
Number |
Symptoms |
Disease or Injury |
|
1 |
|
|
|
2 |
|
|
|
3 |
|
|
|
4 |
|
|
|
5 |
|
|
|
6 |
|
|
|
7 |
|
|
|
8 |
|
|
|
9 |
|
|
|
10 |
|
|
Sensors
A ship’s Sensors station is its “eyes and ears” of space. Without someone in the Sensors role, a ship may find itself in trouble with little time to react. A ship's Scanners can be used to locate threats or targets in space, and its Targeting System can provide the ability to selectively reroll attack dice during a pitched space combat session. Other vehicles and even body armor can have Scanners and Targeting systems as well, allowing these skills to be utilized in other places.
Sensor Skills
Scanners
There are various kinds of Scanners and scans that can be performed by them. The main distinction is whether a Scanner is used in Active Mode (sending out harmless radiation that bounces off of things to provide data) or Passive Mode (an antenna that receives the radiation that is already in the environment). Active Mode additionally can be Directed to extend the range at the cost of a narrow focus. The skill with Scanners is almost as much interpreting the data as it is directing the scan. Scans can be filtered for Power Systems, Life Forms, or other Active Scans. Medical scanners are a subset of Scanner that can provide bonuses to a Diagnosis roll.
The Sensor Station can also provide real-time targeting data on enemy position and velocity. This translates into the ability to reroll any and all damage dice during combat if a Target Lock was acquired. Like with other skills, the Scanning skill can be used for any weapon’s system with targeting capabilities, including air vehicles, ground vehicles and even some ground-unit personal weapons.
Main Attribute: Perception
Science
The Science skill is rolled when the character wishes to understand the results of a strange scan, or when the character is trying to understand physical phenomena. Dealing with black holes, hyperspace, wormholes, or quantum phenomena is the domain of the Science skill. Science is often used in conjunction with Mechanics to build a device that exploits a new domain or paradigm. On a personal level, Science can be used to build devices that change energy, create force fields or bend light.
Main Attribute: Intelligence
Scanner Challenge
Scanning Challenge Die
|
Roll |
Meaning |
Symbol |
|
1 |
Anomaly |
|
|
2 |
Creature |
|
|
3 |
Encounter |
|
|
4 |
System |
|
|
5 |
Nav Data |
|
|
6 |
Obstacle |
|
|
7 |
Power |
|
|
8 |
Treasure |
|







Overview
The Scanner Officer must play a memory game where each roll makes them have to find the corresponding face down question token.
The GM shows all, the Scan Officer memorizes them, and then the GM flips them face down behind the GM screen.
Player Goal(s)
- The Scanner Officer must clear the “Sensor Ghosts” to find out what’s actually there.
- The Scanner Officer wins if they successfully clear the required number of Sensor Ghosts.
- The Scanner Officer loses if they can’t clear the required number of Sensor Ghosts.
Player Actions
Check Sensor Data
The main action for the Scanner Challenge is for the Sensor Operator to Check the Sensor Data. To do this they roll the Challenge Die and find the face down Question Token that corresponds to the result they rolled.
If they successfully find the face down Question Token, they clear 1 Sensor “Ghost”.
The Sensor Operator can fail a number of times equal to their Scanner Skill Rating + Science Skill Rating without losing the challenge.
Target Lock
To perform a Target Lock instead, the Sensor Operator must flip the Question Token that corresponds to the thing that they want the Target Lock on. This will likely be “Creature”, “Encounter” or “Obstacle”, but could be any of them. As usual a Target Lock can be sacrificed to reroll dice pertaining to firing something at the Target (including a Tractor Beam to pull in Treasure, or the Hyperdrive to jump to a System).
They can use Targeting to “lock on” to the Scan Event, and use weapons / tractor beams to move it.
Scientific Analysis
The Sensor Operator can attempt to analyze the sensor data that they've received to do a scientific analysis on the target. They can use their Action to perform this instead of one of the other two actions, but this sacrifices 1 point of their "Scanner" skill to do so. The result is that the Sensor Operator gains information on that data. In game terms this allows them to keep that token face-up.
Die Results
Anomaly
A strange space / time effect, best to be avoided.
Creature
An alien creature, possibly a dangerous monster, best to be avoided.
Encounter
A sentient, technological alien encounter, possibly dangerous, best to be avoided.
System
A star system or other major thing detected.
Nav Data
A set of navigation data that help the Pilot to get to the next area.
Obstacle
A dangerous but inert object that may damage the party just because it’s in the way.
Power Reading
Some kind of power signature, like a ship, space-station or alien city.
Treasure
A spacer-chest, debris or other valuable item is found.
Additional Rules
Increasing the difficulty can be done by adding additional tokens (1-4) or by rotating the board after the player has looked at all of them. Extending the time from when they scanned them can also increase the difficulty.
Scout
When a character is in the Scout role, it’s their job to move ahead of the main party (or in some cases behind or to the side) and look out for danger. Scouts should be stealthy, so that they avoid detection, and should have good Perception, because they need to be able to spot good hiding places or details about an enemy force.
The Scouting Skills are key for a Reconnaissance, Infiltration or Exfiltration mission.
If there is no one in the Scout role, a party can easily be surprised by an enemy force.
Scouting Skills
Observation
The Scout uses their Observation of the environment to spot good hiding places. The Scout rolls Observation to find a spot with Concealment (see the Stealth System). They use their Observation of enemy forces to gauge the type and number. They can use Observation on a single guard to guess at that guard's Alertness and other qualities, as well as that guard's movement patterns. Observation is critical to give the Scout as much information as possible.
Main Attribute: Perception
Stealth
The other critical skill for a Scout is their Stealth skill. This determines how well the Scout can move quietly and without attracting notice. Note that this skill is for physically moving through places where you don't want anyone to see you. For following someone through a crowded urban space without being detected, see the Bounty Hunter's Shadowing skill. Sneaking is also used for pickpocketing and planting items on targets without their notice (in which case it uses Deftness instead of Agility).
Main Attribute: Agility
Scout Challenge
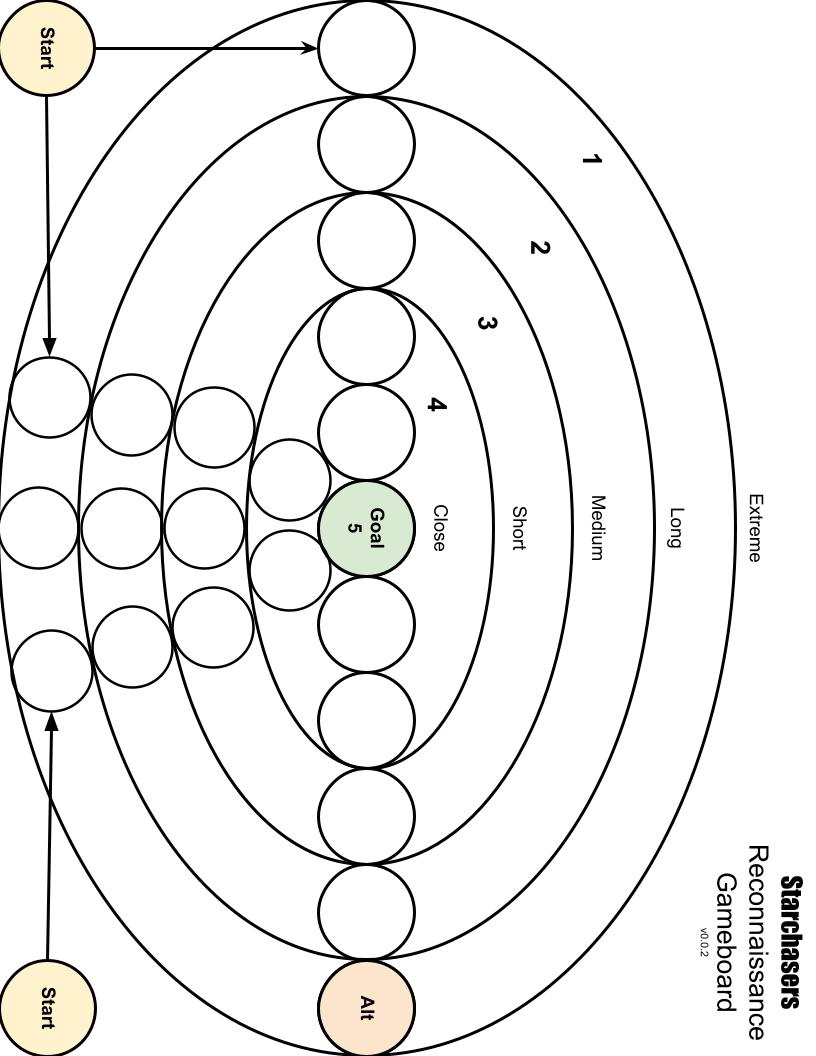
The Scout challenge is a Reconnaissance mission. The Scout must balance the risk of being detected agains the rewards of gaining additional intelligence about an enemy force.
Reconnaissance Challenge Die
|
Roll |
Meaning |
Symbol |
|
1 |
Observe +1 |
|
|
2 |
Observe +1 |
|
|
3 |
Observe +1 |
|
|
4 |
Obstacle |
|
|
5 |
Obstacle |
|
|
6 |
Guard |
|
|
7 |
Noise Event |
|
|
8 |
Spotted Event |
|




Obstacle Type Table
|
Roll |
Meaning |
Symbol |
|
1 |
Locked Door |
|
|
2 |
Physical Barrier |
|
|
3 |
Animal Guard |
|
|
4 |
Computer System |
|


Overview
The Scout is trying to obtain as much information as possible without being Detected.
Player Goal(s)
- To gain Intel without being discovered.
- There is a set amount of Reconnaissance Intel in an area. If the Scout gets it all and then leaves without being Detected, they win.
- Sometimes gaining the Intel is more important and Scouts may risk Detection to get all the Intel they can.
- Other times avoiding Detection is paramount, so Scouts may attempt to leave after obtaining any Intel.
- If the Scout is Detected, then the Reconnaissance Challenge ends. A Combat or Social challenge may result.
Game Setup
The Gamemaster prepares up to 5 pieces of Intel that the Scout can obtain.
They place the Reconnaissance Game Board in front of the player.
This Intel will be available at the appropriate number at each distance from the center.
Alternatively, the Scout may have to get all the way to the "Goal" at #5 to try to get all of the Intel at once.
The Gamemaster places a Guard token or Guard miniature at 1, 3 and 5 in any circle.
The Gamemaster may place up to 3 special Stealth-Game Question Tokens on the map, things like Key, Locked Door, Noise Event, and Treasure are good ones.
The Scout chooses an approach and places their token or miniature on one of the "Start" circles.
The Game Board can support 2 Scouts at the same time.
Player Actions
The Player gets 2 Actions per Turn. They must carefully balance searching for Intel via the Observe Action with moving and staying out of detection range.
Observe
The most critical action to complete this mission, the Scout rolls their Observation against a difficulty which begins at 10 and is reduced by the level that the Scout is currently at (so 9 at space #1 and 5 at space #5). The Scout rolls their Observation against the Difficulty that the GM rolls. Any uncanceled Hits reveal 1 piece of Intel.
Hide
The Scout spends the turn Hiding and regains +2 Stealth.
The Scout can roll the Reconnaissance Challenge Die if they are on a numbered space.
If the Scout spends 2 turns in a row Hiding, the Gamemaster should move all Guards to an adjacent space, to prevent a stalemate.
Sneak
The Scout spends the turn Sneaking and moves 1 space. This means moving to an adjacent circle, where adjacent means either directly touching, or on the same Range Band with nothing in-between. Diagonal movement requires 2 Sneaks or a Dash.
If a Guard is in an adjacent space when the Scout begins their Sneak, the Sneak requires a contested roll:
-
Sneaking vs Alertness.
The Scout can spend Stealth Tokens to compensate for a failed roll. If they cannot spend enought Stealth Tokens to cancel out the Guard's Alertness Evades, then a Spotted Event is triggered (see below).
Dash
The Scout can lose 1 Stealth Token to move 2 spaces.
Similarly to Sneak, if a Guard is in an adjacent space when the Scout begins their Dash, the Dash requires a contested roll:
-
Sneaking vs Alertness.
Again, the Scout can spend Stealth Tokens to compensate for a failed roll. If they cannot spend enought Stealth Tokens to cancel out the Guard's Alertness Evades, then a Spotted Event is triggered (see below).
Interact
Costs 2 Stealth but is required to attempt to bypass an Obstacle.
Obstacles block the path through the circle until they are defeated, at which point they are removed from the board.
Distract
The Scout attempts to Distract the nearest Guards in the hopes that they will move to the adjacent circle the Scout designates.
-
Sneaking vs Deduction.
If a Guard is successfully Distracted, they will not react if a Noise Event or Spotted Event is rolled on the Reconnaissance die.
If the Scout fails, they lose 1 additional Stealth Token and the Guard will begin Searching on their next Turn.
Surprise Attack
The Scout can spend 1 Stealth Token to attempt to perform a Surprise Attack on a single Guard in an adjacent circle.
Circles are considered adjacent if they are either: a) on the same Range Band and nothing is in between, b) on the next Range Band over and directly adjacent.
The Scout rolls an attack vs the Guard's Armor Defense:
-
Surprise Attack vs Armor Defense.
If the Guard survives, this triggers a Spotted Event (see below).
In either case, this generates a Noise Event (see below).
Die Results
Observe
The Scout gains 1+ dice for their Observation Roll.
Obstacle
The Gamemaster rolls on the Obstacle Type Table and places the corresponding Obstacle Token at a Range Band based on a d6 die roll.
The Scout must either clear the Obstacle or bypass it by moving around it.
Obstacles can often be cleared by either the Technician (Computers or Lock Picking) or the Athlete (Athletics or Acrobatics).
If the Scout beats the associated Skill Check, the Obstacle is cleared and removed from the board.
If the Scout fails the Skill Check, they can try again on another turn.
Each attempt causes the Scout to lose 2 Stealth.
Guard
An additional Guard appears.
The Gamemaster rolls a d6 and places the Guard token/miniature at the Range Band rolled. If there are no unoccupied circles at that Range Band, the Gamemaster can squeeze it in the empty area between circles, or they can place it at an adjacent Range Band.
Noise Event
The Scout has made noise, or a noise was made near the Scout coincidentally. In either case, this is bad.
The Gamemaster rolls a d4. The result is how many Range Bands away the Guards heard the Noise and will come investigate.
After the Scout's next turn, each Guard that is able to move (open adjacent circles) will move towards where the Scout was when the Noise Event was generated. This means that the Scout has 1 turn to move somewhere else to try to avoid being surrounded.
Spotted Event
If the Spotted Event is rolled, or if the Scout generates a Spotted Event by failing a Sneak roll, the Scout has two options:
-
Spend 1 Motivation to perform a Sneak or Dash and move to another space.
-
Attempt to Hide in place, rolling Hide to recover Stealth Tokens vs the Guard's Alertness.
However, in the case of a Spotted Event, the nearest Guards will begin Searching (after the Scout's turn).
This means that any adjacent Guard will be able to roll:
-
Searching vs Hiding.
If the Guard succeeds and the Scout cannot spend Stealth Tokens to eliminiate Hits, they will be Detected and the Reconnaissance Challenge will end.
Additional Rules
The Gamemaster can opt to use these additional rules if they feel that the Reconnaissance Challenge is not difficult enough, or the narrative suggests them.
Moving Guards
Guards move every turn, instead of just when a stalemate would occur (i.e. the Scout Hides two turns in a row).
Suspicion Meter
The Suspicion Meter can be used to give the Scout a timer.
Each Round that the Scout spends increases the Suspcion by 1.
If the Scout is Spotted or a Spotted result happens on the Reconnaissance die, then Suspicion increases by 1.
When the Suspicion Meter is maxed out, Guards will begin Searching and Search every turn.
Chatty Guards
Guards are a threat, but also an opportunity, there are some bits of Intel that can only be obtained if there are 2 or more Guards present on adjacent spaces. If the Scout is nearby then the Guards chat with each other, revealing the valuable information.
Protected Guards
Guards cannot be “taken out” with a Surprise Attack during a Reconnaissance Challenge. It is assumed that they are too far away or protected to be easily KO'ed by the Scout.
Zero Stealth and Spotted
If the Scout has Zero Stealth and the Challenge Die lands on Spotted, that Scout will be automatically Detected and the Reconnaissance Challenge will end in failure.
Multiple Scout Rules
- Multiple Scouts can each roll the Reconnaissance Challenge Die to obtain Reconnaissance Intel
- Reduced Stealth and Detection Events affect only the Scout that rolled them
- Guards and Obstacles affect all Scouts
Independent Scouts roll separately and have separate mini-games. Scouts in the same area roll together and share some results.
Survivalist
The Survivalist has the knowledge and skill to survive in the harsh conditions of a planet’s wilderness. They know how to navigate through dark woods, dense jungles or baking desserts. They also know how to forage for food and water and avoid dangerous encounters. Finally the Survivalist has skill in dealing with wild, alien animals, which may allow for diffusing dangerous situations, taming and even training these beasts.
Survivalist Skills
Animal Handling
The Animal Handling skill is used when a character wishes to interact with a wild animal, to prevent it from attacking. It is also used to tame and train a wild animal to domesticate it. Finally the skill is used to command a domesticated, trained animal. The difficulty for these rolls is based on the disposition of the animal.
Main Attribute: Perception
Survival
The Survival skill is rolled for multiple purposes:
- Foraging for food and water
- Looking for shelter, constructing shelter
- Predicting weather
- Avoiding dangerous alien animals
- Avoiding poisonous alien plants
On a harsh alien world having an expert in Survival can mean the difference between life and death.
If there is no one in the Survivalist role, the party will have to make due with their packed rations, water canteens and tents, and may stumble into dangerous animals and plants without warning or facility.
Main Attribute: Intelligence
Survivalist Challenge
Survival & Animal Handling Die
|
Roll |
Meaning |
Symbol |
|
1 |
Track |
|
|
2 |
Track |
|
|
3 |
Track Track |
|
|
4 |
Storm |
|
|
5 |
Food |
|
|
6 |
Water |
|
|
7 |
Rest |
|
|
8 |
Encounter |
|





Overview
The Survival challenge is actually four different potential challenges. First there’s the Animal Handling challenge. This determines whether a player can tame or train a wild animal into becoming a Pet or even Companion. The second is the Survival Challenge, where the Survivalist must keep the party alive for a series of days until rescue arrives. Next is the Tracking challenge, which has the Survivalist track a target through the wilderness. Finally there’s the simple Travel challenge, which is really more of a simple resource management game.
Player Goal(s)
- Animal Handling:
- To respond to the animal’s needs to earn Taming Points or Training Points
- Animal Handling can be won if the Survivalist reaches 7 Love before the pet runs away or attacks the Survivalist.
- Animal Handling is lost if the pet runs away or if the beast attacks and the Survivalist has to put it down.
- Survival:
- To avoid running out of Food, Water or be Exposed to the Elements
- Since losing Survival implies dying, the Survivalist will usually not lose this challenge, however the characters can gain a lot of negative penalties and be unhappy as they go into other challenges, such as Combat or Stealth in a weakened state.
- Tracking:
- To successfully Track the target in the wilderness
- Tracking is won if the party catches up with the target being Tracked.
- Tracking is lost if the target gets to the “goal” before the party catches up.
- Travel:
- To Travel through the wilderness towards their goal.
- Traveling can’t really be “won” or “lost”, but characters can waste resources or get literally lost in the wilderness.
Player Actions
Survival, Tracking & Travel
- Move: the Survivalist moves towards the target being tracked. If the party catches up, another Encounter will be triggered
- Search: Suffer 1 Stress and Flip a Question Token.
- Forage: Gain an amount of what was rolled (food, water, shelter), but do not move.*
- Do Nothing: In the case of a Storm, the party can stay still and weather the Storm.
*If Food, Water, Rest or Storm comes up, the party can continue to Progress, but they consume resources or suffer Stress and eventually Damage if they don't have the resources.
Animal Taming / Animal Training / Animal Care
- Feed animal (reduces Hunger)
- Give animal water (reduces Thirst)
- Calm animal (reduces Fear or Anger)
- Let the animal rest (reduces Tiredness)
- Track animal that has Run Away
- Play with animal (increases Love if animal is not unhappy)
Die Results
Track / Travel
This result means different things depending on whether the party is tracking something or traveling.
Animal Handling
The animal will Run Away if its Unhappiness value is greater than its Love value.
The owner can make a Perception + Alertness check based on the animal's size and natural stealthiness.
Survival
In the Survival mode, this means “Time Passes”, and is a neutral result.
Tracking
The Track result indicates that the target has moved and the Survivalist needs to make a Survival Check to follow it.
Travel
The Travel result indicates that the Survivalist can move the party 1-2 hexes or squares, depending on the roll result. This allows the party to get where they want to go.
Storm
Animal Handling
A Storm will frighten an Animal, causing them to go into Hiding. This can also represent the general concept of something scary to an animal.
The animal's Fear increases.
Survival
When the Storm result appears, the Survivalist needs to either find Shelter for the party, or everyone will need to make Resistance rolls. Failure may cause Stress or even Damage.
Tracking & Travel
Tracking and Traveling become much harder during a Storm, all characters suffer 1 Stress and if the Survivalist fails their Survival roll, the party will get Lost.
Food
Animal Handling
In the case of an Animal Handling, this means that the Survivalist needs to feed the animal something that they can eat.
The animal's Hunger increases.
Survival, Tracking & Travel
When the Food result appears, the Survivalist either needs to procure Food or the party loses 1 Food per member. If there is no Food, the party will suffer 1 Stress each. Once characters have maxed out their Stress, they will begin to suffer Damage without Food.
Water
Animal Handling
The animal needs Water. Its Thirst increases.
Survival, Tracking & Travel
The party needs Water. The Survivalist can stop their movement to procure Water or each party member will Consume 1 Water. If there is no Water, the party will suffer 1 Stress each. Once characters have maxed out their Stress, they will begin to suffer Damage without Water.
Rest
Animal Handling
The Pet is tired and needs to rest. The animal's Tiredness increases.
Survival, Tracking & Travel
The Party is tired and needs a rest, if they don’t rest everyone will suffer 1 Stress.
Encounter
Animal Handling
If the animal's Unhappiness is greater than its Love, the animal will attack the tamer/owner. The tamer/owner must calm it down without hurting it while the pet attacks them.
Survival
If the result of the Wilderness Travel die is Encounter, the party has an unavoidable encounter. However, if the party has Scouts, those Scouts can intercept the Encounter first. If the party has no Scouts, or if the Scouts fail to intercept and the party has Guards, those Guards get to act.
Additional Rules
The main game modes for this are Animal Handling, Survival, Tracking and Traveling.
Animal Handling
For Animal Handling, the GM rolls the Challenge Die and then marks the status on the Animal Card:
- Food -> Hunger
- Water -> Thirst
- Rest -> Tiredness
- Storm -> Frightened
- Encounter -> Angry/Attacks
- Travel -> The pet / animal may run away and must be tracked or the player may lose it.
- Love -> Each day that the Survivalist keeps the animal's Unhappiness at Zero, the Survivalist can play with the animal, which causes the animal's Love to increase by 1. Wild animals start with Love of 0 and all animals have a maximum Love of 7.
- Unhappiness -> this is a threshold. If the animal's needs are unmet to a certain extent, it's Unhappiness will increase.
Once an animal reaches 7 Love it becomes Tame. The Animal Handler can repeat this exercise while training the Animal to teach it an ability or increase an attribute.
Normally a Tame animal will not run away anymore, so the player character will just get into a routine and know how the animal feels more often.
Tame animals can be trained up to level 5, which means they can learn up to 4 abilities and gain 1 attribute point, or gain five attribute points, or any combination of those.
Design Note: What’s to prevent the Survivalist from just doing “all the things” to the pet every time? Feeding it, giving it water, letting it rest, consoling it? Well, I guess part of it is that some of them are mutually exclusive. You can give a pet food and water at the same time, but you either leave it alone to rest or you calm it. So maybe it’s just like that. You have to pick one of these things each time the rest of the party rolls their challenges.
Survival
The game of the Survival Challenge is mostly moving around a high-level map and trying not to consume too many resources, and recover resources in the field while waiting for rescue.
Tracking
This uses the Race/Chase board. The difficulty is the head start that the target has. Each Round the GM rolls a single Red Attack Die for the target being tracked. On a Hit the target moves 1 place towards the Goal. On a Critical Hit, the target moves 2 places. If the target reaches the Goal before the Survivalist catches up, the PCs lose. If the PCs catch up, there may be another type of Encounter (Stealth, Social or Combat).
Traveling
The Travel game is similar to Survival, but with a focus on getting to the location in as good of condition as possible (less Stress and Damage).
Tactician
The Tactical role tries to see the big picture, focusing on the overall strategy or tactics of a conflict, rather than the individual exchanges. Those in Tactical can attempt to gauge how dangerous each opponent is and the opposing side overall. This allows them to focus on whether to advance or retreat while others are engaged in individual conflicts.
Tactical Skills
Assessment
The Assessment skill is used to gauge how powerful an individual opponent is, as well as the entire side of a conflict.
The difficulty for this roll is based on the highest opposing Stealth or Deception skill total.
In addition the Tactician can gauge their own side to tell which side has an advantage in the conflict.
The difficulty for these rolls depends on how intense the conflict is and if there are other distractions.
Assessment can also be used to tell how good an ally is at a certain skill, which can be used to properly assign those allies to roles.
A proper Assessment of a crew makes it easier to use Coordination to achive bonuses for them (see below). The difficulty for ally Assessment is a standard Intermediate(3) difficulty.
Main Attribute: Perception
Coordination
The Coordination skill allows the Tactician to give their allies Focus Tokens if they listen to their tactical advice.
To give another character a Focus Token, the Tactician uses an Action to give the target ally a suggestion or salient piece of intel. That ally gains a Focus Token to use on the associated Action.
The difficulty of the Tactician's roll is based on how poor the communication conditions are and how hectic the battle is (typically a number between 1 and 5). The number of allies that they are trying to grant Focus Tokens to is also a factor. Each additional Ally adds +1 to the difficulty roll.
For each ally that has already had a recent (within this session) Assessment, the difficulty is reduced by 1.
The Tactician cannot include themselves in the roll, unfortunately.
Main Attribute: Intelligence
Tactical Challenge
Incomplete
Technician
The counterpoint to the Survivalist, the Technician is at home on a highly technological planet. They know how to navigate the planet’s Holonet, how to get information quickly, and how to interact with an alien computer or device. Technicians can reprogram Droids and computers to an extent. Technicians can use and understand various Gadgets, even if they are alien in design or function. Finally the Technician can bypass or disable some electronic locks and other security measures.
If there is no one in the Technician role, the party will be at the mercy of alien computers and Droids, and will not be able to breach locked doors quietly and will almost certainly set off multiple alarms.
Technician Skills
Lock Picking
A Technician can .
The Lock Picking skill used whenever the Technician is trying to bypass an electronic or physical lock. They make have an electronic scrambler or a set of physical lockpicks, or a hairpin and a spanner.
The Lock Picking skill is also used when a character attempts to “hot wire” a device.
Main Attribute: Deftness
Computers
The Computers skill allows the Technician to access a local computer to try to extract information out of it. They can use this to get information out of the Holonet or the local network as well. Though this is not as sophisticated as the Slicer’s Slicing abilities, it can be enough to access non-restricted information or functions. The difficulty for these depends on the level of security in place in that network or computer.
The Computers skill is also required to access a Droid’s brain to reprogram it (either with, or without its consent). The difficulty for this is the Droids Confidence + Disposition (+- Mood).
Main Attribute: Intelligence
Technician Challenge
Simple Slicing Challenge Die
|
Roll |
Meaning |
Symbol |
|
1 |
Compute (Computers) |
|
|
2 |
Compute (Computers) |
|
|
3 |
Compute x2 (Computers) |
|
|
4 |
Link |
|
|
5 |
Firewall |
|
|
6 |
Trace |
|
|
7 |
Data |
|
|
8 |
ECM |
|




Overview
The Technician attempts to Slice into a computer system, network or Droid brain. They win if they can either take valuable Intel, or give the system/Droid some Command that it must obey. A Technician must have a datapad, slicer deck or datajack (cybernetic implant) in order to engage in a Simple Slicing Challenge.
Player Goal(s)
- To achieve a high enough Compute value to Gain Control of the System.
- The Slicing Challenge will have an associated Compute Target, if the Slicer gains that must Compute, they win the Slicing Challenge.
- To avoid suffering too much Stress and being KO’ed.
- If the Technician suffers too much Stress, they will be knocked unconscious.
- To avoid getting too many Traces.
- If a Technician receives Traces equal to the system’s Alarm Threshold, an Alarm will be triggered and the physical location of the Technician may also be reported (to an appropriate security team).
- To avoid losing all Links to the system.
- If a Technician loses all Links to the system, they will become Disconnected and lose the Simple Slicing Challenge.
Player Actions
During their Turn in the challenge, the Technician can take 1 Action. It can be any of the following:
Overclock
The Technician obtains 1 extra Compute, but suffers 1 Stress.
Disconnect
The Technician forcibly disconnects to remove all Traces. However, the Technician Loses 2 Links in the process.
If the Technician was Engaged with an ECM, their Combat immediately ends.
Brute-Force
The Technician spends 2 Compute to Breach a Firewall-Prompt but also gains 1 Trace.
Guess
The Technician can attempt to guess the password to a Firewall-Prompt. This password will be an 8-letter word. The Technician can roll their Computers skill, each Hit will reveal 1 unique letter of the password to the Technician, making guessing it slightly easier.
The Technician can Guess 3 times a turn.
Making 3 inaccurate guesses will lose 1 Link.
Reroute
Spend 1 Compute and suffer 1 Stress to either:
- lose 1 Trace or
- gain 1 Link.
Attack
Use software to directly attack ECMs. Combat with an ECM can take multiple Rounds.
To attack the ECM, the Technician rolls their Computers skill. To defend against an attack, the Technician rolls their Emotional Control skill. Any damage that the Technician takes is suffered as Stress. If the ECM takes more damage than it has Hit Points, it is derezzed and disappears.
Die Results
Compute
The Technician makes progress in their simple slicing attempt, to gain access to restricted information, or to remotely control a function or system.
Link
The Technician obtains an additional connection, or “Link”, to the computer. When all Links are broken, the Technician becomes disconnected and locked out, failing the Simple Slicing Challenge.
Firewall-Prompt
There is a digital obstacle: a Firewall with a password Prompt. Bypassing this can damage the connection Links or gain a Trace. The Firewall-Prompt blocks all further progress until it is bypassed. The Technician must either try to Guess the password, or they can Brute-Force their way through.
Trace
The Technician gains a Trace from the security system. After a certain number of Traces are attached, the physical location of the Technician can be targeted or swept with physical security. Exceeding the threshold of Traces will not immediately end the Simple Slicing Challenge, but it will put the Technician in physical jeopardy.
Data
The Technician obtains a piece of Data, which may be useful later on or can be the whole point of the exercise. Often Data contains a clue as to the password one can use to bypass a Firewall Prompt.
ECM
An Electronic Counter-Measure, which is an agent of the computer system designed to eliminate intruders. Must be battled using Slicer software. Doing enough damage to the ECM will cause it to “derez”, which will eliminate it as an obstacle. An ECM does Stress back to the Technician with each attack it performs.
An ECM will block all further progress until it is derezzed.
Additional Rules
Starting Links
The Technician rolls their Deftness + Lock Picking and gains 1 Link per Hit at the beginning of the Slicing Attempt and must maintain at least 1 Link or be Disconnected and locked out of the system (Critical Hits count as 2 Hits and give Link 2).
Compute Target
The Technician must achieve a certain Compute Target in order to Slice into the system. The Gamemaster or Scenario Designer will designate a Compute Target for the Slicing attempt.
|
Compute Target |
Challenge Difficulty |
|
3 |
Very Easy |
|
5 |
Easy |
|
7 |
Intermediate |
|
9 |
Challenging |
|
11 |
Hard |
|
13 |
Very Hard |
Alarm Threshold
When a Technician gains a number of Traces equal to the Alarm Threshold, an Alarm will be triggered and the Technician will be located by physical security.
The Alarm Threshold is related to how Alert the system is to intrusion.
|
Alertness Level |
Alarm Threshold |
|
Sleepy |
5 |
|
Normal |
4 |
|
Alert |
3 |
|
Searching |
2 |
Digital Combat
Technicians perform a type of virtual combat with ECMs.
For initiative, the Technician rolls their Perception + Alertness.
For attacks, the Technician rolls their Computers skill against the ECM’s Passive Defense.
For defending, the Technician rolls their Lock Picking against the ECM’s incoming attack roll. This represents them using their Lock Picking skill to create an electronic barrier for defense.
The Technician suffers Stress from ECM attacks, which are marked against their Stun Points. If the Technician's Stun Points reach zero, they are knocked unconscious (but do not suffer an Injury.
ECM Statistics
ECMs have the following base Attributes:
- Offense: How much damage the ECM does with an attack
- Defense: How many defense dice the ECM gets.
- Initiative: The ECM’s Movement speed as well as Initiative dice pool.
- Hit Points: How much damage the ECM can take before being derezzed.
ECM Combat Flow
Both the Technician and the ECM roll their Initiative, and the one with the most Hits goes first. Critical Hits count as 2 Hits for this part.
Attack: A Technician or ECM can attack the other. Each one rolls its Offense in Red Attack Dice against the other’s Defense in Green Defense Dice. Evades cancel Hits first, then Critical Hits.
Each uncancelled Hit does 1 point of Damage to the target’s Hit Points. If an ECM is reduced to zero Hit Points by Damage, it is derezzed and disappears. The Technician takes Stress which is marked against their Stun Points. When the Technician's Stun Points are reduced to zero, the Technician falls unconscious (but is not Injured).