Starship Combat
These are the rules for Starship Combat, which includes when the party is on a single ship, and when each member has their own ship.
Starship Combat is assumed to be played with tokens on a map, either a physical map or a VTT. These Starship combat scenarios are typically unavoidable combat involving between two and up to a dozen ships. More ships than that (6 on a side) would sipmly take too long to be fun.
For simpler rules that apply to a moving vehicle when it's simply trying to flee, see the Helm Challenge in the Adventure System section.
Space
The space that starship combat takes place in is described in this section.
Ship Speed to Movement
Each ship moves a number of squares / hexes / inches equal to its Speed.
Ships move by selecting a Maneuver, which dictates how far it moves forward, whether it turns and which way, and how far it moves laterally.
If a ship's Movement would cause it to exit the map area, it is considered to be “Fleeing”, and only ships in Close Range before the ship leaves the map (see below) can pursue.
Range Bands
There are several range bands. If using a free-form map, one without hexes or squares, then 1 square is equal to 1 real inch.
Collision
Collision Range is 0, or in other words directly adjacent.
Close
Close Range is 1 when using the X-Wing range finder. (2-4 squares away)
Ships attacking others in Close Range gain +1 Attack die in their pool.
Short
Short Range is 2 when using the X-Wing range finder. (5-7 squares away)
Medium
Medium Range is 3 when using the X-Wing range finder. (8-15 squares away).
Ships being attacked at Medium Range add +1 Defense die to their evasion pool.
Long
Anything past the edge of the X-Wing Range finder, but still on the battle map is Long Range.
(16-20 squares away)
Ships that are attacked at Long Range gain +3 Defense dice in their evasion pool.
Extreme
21+ squares away is Extreme Range. When using the X-Wing range finder, this is anything that has left the battle map.
A ship at Extreme Range has either fled from the battle, or has fallen off the end of the range and must spend 1 Round to return.
Time
The time during Starship Combat is explained here.
Rounds
Starship Combat is conducted in rounds, where each round is a collection of Phases & Turns.
Initiative
The Initiative roll determines what order ships move and attack in.
- Initiative
- Pilot's Perception + Pilot Skill
NPC ship’s Initiative is based on the NPC Pilot’s skill value.
Higher Initiative ships move later and shoot sooner.
Turns & Phases
A turn in starship combat is a collection of Actions.
However, combat happens over several phases, so a character's turn may be split across multiple phases:
- Planning Phase: PC Pilots and the GM choose maneuvers for their ships.
- Movement Phase: Ships moves to new positions in order
from lowest initiative to highest initiative
- Maneuvering the ship is considered to be one of the Pilot's 2 Actions
- Shipboard Phase: Characters aboard ships may take up to 2
Actions if they haven’t yet taken an Action.
- Actions during this phase are typically one of the six Ship Station Actions.
- Weapons Phase: Each ship may perform one or more attacks. Each weapon can only be activated once per Turn.
- Cleanup Phase: Convert destroyed ships into Debris Fields. Remove unused Tokens, etc.
Each phase acts as a “mini-round” where all characters may have a chance to act, though some characters may choose “pass” if they can't perform an action on that phase.
Planning PhaseEach Pilot player selects a maneuver, and the GM selects a Maneuver for each NPC ship.
Movement Phase
When every Pilot player has selected a maneuver, they each flip their dial/card face-up based on their Initiative in reverse order. This means that the lowest Initiative moves their ship first, then the higher one goes next.
Collisions
If ships would overlap, the second ship moving is placed just so that its base is touching the other one. Both pilots then roll to avoid the collision (or if one pilot wants to collide, they roll for that instead). If both pilots are avoiding the collision and get at least 2 successes (on the Attack die) then they do not collide. If the ships do collide, they each take 1 die of damage per the faster ship’s Speed rating (so if it was using a 3 maneuver, both ships would take 3 damage dice of damage).
If a ship would overlap with an obstacle (asteroid, debris field), then that ship’s pilot rolls to avoid the collision. If they fail, they take 1 damage per speed that their maneuver had (if the ship was moving at 4, it would take 4 dice worth of collision damage).
Shields absorb Hits and Critical Hits as usual.
Critical Hits on collisions can do system damage if they are not blocked by shields.
In any case, a Collision consumes all of the Pilot’s Actions. If there are multiple Pilots involved in a Collision, it will consume all of their Actions.
Types of Maneuvers
- White: A normal maneuver, has no other effects
- Red: This type of maneuver causes 1 Stress to the ship.
- Blue/Green: This type of maneuver reduces 1 Stress from the ship and does not consume a Pilot Action.
Each Stress suffered is recorded against the ship’s Stress Taken, and if the Stress Taken exceeds the ships's System Durability, the ship suffers from 1 System Damage.
Shipboard Phase
Ship crew that are not firing weapons can take Actions on this phase:
- Command: Can sacrifice an Action to give another character on the same ship an additional Action
- Comms: Can try to talk to other ships and send encrypted messages. Can also send out a Distress Beacon.
- Engineer: Can Repair Hull Points with the Mechanics skill, can attempt to repair Systems Damage, Can allocate Power Dice to other systems.
- Medical: Can perform First Aid or Medicine on any of the injured characters.
- Pilot: Can perform the Evasive Maneuvers Action to use one free Active Defense during their turn. Can perform the Boost maneuver to get slightly more speed from the ship at the cost of suffering 1 Stress.
- Scanner: Can scan ships to get stats. Can attempt to get a Target Lock on a single ship. Can also attempt to detect a cloaked ship.
- Weapons: Can perform the Aim action, which would allow them to reroll 1 Attack Die.
Weapons Phase
During the Weapon’s Phase each ship can fire each weapon they have at most once. Each weapon activation additionally requires 1 Action. Defending ships typically use their Passive Defense to defend.
Ships fire weapons in descending Initiative order. If the Weapon’s officer hasn’t used any other actions, they can fire two separate weapons each once.
Linked weapons all activate at the same time and add their dice together with the gunner’s Proficiency bonus (if any).
Cleanup Phase
Damage is resolved, ships that are destroyed are converted into Debris Field obstacles.
Any remaining Focus or Evasion tokens are removed.
Target Locks stay until they are used or Jammed.
Fleeing
Any ship that overlaps with the edge of the playmat has the option to Flee. If a ship’s maneuver would take it completely off of the playmat, it has fled. If all party ships have fled, the game can either progress into a Chase (if enemy ships were within Medium Range when the last ship fled) or simply have the Encounter end (if enemy ships were further than Medium Range when the last ship fled). This also works the other way around (i.e. PCs attempting to capture a fleeing NPC ship).
Actions
Each character gets two Actions during combat, but there are some physical restrictions that prevent certain Actions being performed more than once. Characters can perform multiple Free Actions per turn.
Standard Maneuvers
This is the list of all maneuvers that ships can possibly take, however some ships are not built for many of the Advanced Maneuvers, and as such they suffer from 1 Stress each time they perform them.
Easy Maneuvers:
If a ship executes one of these Maneuvers, it recovers from 1 Stress.
Normal Maneuvers:
If a ship executes one of these Maneuvers, it neither recovers from, nor sustains additional Stress.
Hard Maneuveres:
If a ship executes one of these Maneuvers, it sustains 1 Stress.
Basic Maneuvers
These are the basic maneuvers that all ships are able to perform. Each of these has an (N) value which indicates the speed. A ship can always perform a Straight-N at Max Speed, a Bank-N at Max Speed-1 and a Hard Turn-N at Max Speed-2. Some special ships can perform Banks and Turns at higher speeds.
Straight
(N)
The simplest manever, the Straight(N) moves the ship straight forwards by N, which is less than or equal to its Maximum Speed. If the value of N is half of the ship's Maximum Speed, it is usually considered an Easy Maneuver.
Bank (N)

The Left or Right Bank maneuver is a broad turn. It is usually a maneuver of Normal difficulty, but can be Easy if it is speed 1, and can sometimes be Hard for some ships at higher speeds.
Hard Turn (N)

The Left or Right Hard Turn, which is a tight turn in either direction. For most ships this is a Normal maneuver at lower speeds and a Hard maneuver at high speeds.
Advanced Maneuvers
These advanced ship maneuvers are always considered Hard, but can only be executed if either the ship itself supports it, or the pilot has learned the maneuver via the Ace class.
Straight Loop (N)
Also known as the Koiogran Turn, advances a ship straight forward, changing its facing by 180º. This uses the same template as the Maneuver: Straight maneuver.
Bank Loop (N)

Also known as Segnor's Loop, The Maneuver advances a ship at a shallow curve to one side, then reverses its facing. This uses the same template as the Bank Left and Bank Right Maneuvers.
Reverse Roll (N)

Also known as a Tallon Roll,it advances a ship at a tight curve to one side, sharply changing its facing by 180º. This uses the same template as the Left and Right Hard Turn Maneuvers.
Full Stop 
The Maneuver: stop manenuver does not move the ship from its current position. This bearing does not have a corresponding template. A ship that executes this maneuver counts as executing a maneuver, does not overlap any ships, does trigger the effects of overlapping any obstacles at range 0, and continues to be at range 0 of any objects it was touching before executing this maneuver.
Reverse Straight (N)
The Reverse Straight bearing moves the ship straight backward. This bearing uses the same template as the Maneuver: Straight maneuver.
Reverse Bank (N) 

The Reverse Bank Maneuver (left or right) moves the ship at a shallow curve to one side, changing its facing by 45º. This bearing uses the same template as the Left Bank Maneuver and Right Bank Maneuvers.
Barrel Roll 

The Barrel Roll Maneuver allows the pilot to move their ship laterally and adjust their position using the 1 left or right template.
Boost
The Boost Maneuver allows the pilot to gain 1 additional movement Speed.
Standard Actions
Each phase of combat allows for different Standard Actions. In addition, each ship station has a different set of standard actions they can take.
Command Standard Actions
The Commander has only 1 Action type they can use during the Shipboard Phase. Usually a Commander will also man another Ship Station and can perform additional Actions there. Of course if they have at least two crew members, they can use Delegate twice.
Delegate
- Phase
- Shipboard
The Commander can use the Delegate Action to give a crew member on the same ship a 3rd Action.
Comms Standard Actions
The Comms Operator usually doesn't have to use their Standard Actions on Comms during Combat (see Free Actions below), so they may end up performing actions on another Ship Station instead.
Distress Call
- Phase
- Any
The Comms Operator can send out a distress beacon which will broadcast to the nearest systems.
Translate
- Phase
- Shipboard
If ships need to communicate with those who speak a different language during combat, the Comms Operator must use an Action.
Engineering Standard Actions
The Engineer is absolutely critical during Ship Combat. They roll at the beginning of combat to determine how much Power is available to the ship. If there is no one at the Engineering Station, then the only Power Tokens available are any that are granted by the ship's Power Generation attribute. Additionally the Engineer can perform Damage Shunting as a Reaction to reduce System Damage sustained. Finally the Engineer can repair the ship, patching it during combat and giving it a full overhall once combat is over.
Allocate Power
- Phase
- Combat Beginning
The main ship's Engineer can roll their Mechanics (power systems) skill to allocate Power for the combat. Each Hit rolled is 1 Power Token they are able to use during the combat. If the ship has non-zero Power Generation value, a number of extra Power Tokens are automatically added based on this number.
Assign Power
- Phase
- Shipboard
The Engineer can use a Power Token to improve the output of various different systems, from Helm, to Weapons, to Sensors and Comms to various effects. They can spend 1 Power Token to restore 1 Shield Token.
Any number of Power Tokens can be Assigned during a single Action.
The various effects of Power Tokens on the Ship Stations is listed below:
| Ship Station | Effects of Power Token |
|---|---|
| Comms | Spend 1 Power Token to extend the range of the Comms by 1 Range band (i.e. Short->Medium) |
| Engineering | Spend Power Tokens to restore Shield Tokens at a 1-to-1 ratio. Shields restored cannot exceed the ship's Shield Rating. |
| Helm | Spend 1 Power Token to enable the Boost maneuver without the ship suffering Stress. |
| Medical | Spend 1 Power Token to add 1 die to any medical installation (i.e. Bacta Tank). |
| Sensors | Spend 1 Power Token to extend the range of the Sensors by 1 Range band (i.e. Short->Medium) |
| Weapons | Spend 1 Power Token to add 1 die to any Weapon's Damage value for 1 attack. |
Repair
- Phase
- Shipboard
The ship's Engineer can roll their Mechanics to repair Hull Points or System Damage.
Damage Control
- Phase
- Shipboard
The ship's Engineer can prepare for incoming System Damage. By performing this Action, the Engineer can respond to an incoming Critical Hit and roll their Mechanics (power systems) for Shunting that damage as a Reaction one time for free during the folloiwng Round.
Helm Standard Actions
The Helm is the most important Ship Station to have manned, for obvious reasons. The pilot mans the helm and performs the ship's primary maneuver during the Planning and Movement phases. Then they have a variety of defensive and offensive maneuvers that they can perform during the Shipboard phase. Many pilots can also man weapons, and so should think about saving Actions for firing the main guns.
Astrogate
- Phase
- Shipboard
If their ship is at a designated Jump Point, or at the edge of the map, the pilot can attempt to make the jump to Lightspeed.
The pilot rolls their Intelligence + Navigation.
Maneuver
- Phase
- Planning & Movement Phase
The pilot must use one of their two Actions to maneuver the ship. If this is a Maneuver that the ship can support natively, no roll needs to be made, otherwise the pilot must roll their piloting against the difficulty of the maneuver in order to succeed.
Boost
- Phase
- Shipboard
The pilot can use the Boost maneuver to move 1 more square/hex/inch during the Shipboard phase.
Dodge
- Phase
- Shipboard / Reaction
The pilot can use evasive maneuvers to Dodge during the Shipboard Phase, if they do they can use Dodge as an Active Defense as a Reaction once for free.
Evade
- Phase
- Shipboard
The pilot can use the Evade Action to gain 1 Evade Token. This Token can be used to cancel 1 Hit during the Weapon's Phase.
Focus
- Phase
- Shipboard / Reaction
The pilot can spend 1 Motivation to gain a Focus Token. This Token can be spent during the Weapon's Phase to convert all Focus Results into Hits or Evades. Since this uses Motivation, it can be performed any time, and even multiple times per round.
Medical Standard Actions
The Medic can perform their normal two Actions during starship combat: First Aid and Medicine.
First Aid
- Phase
- Shipboard
The Medic rolls their First Aid skill. Each Hit restores 1 Hit Point to the target. Critical Hits count as 2 Hits and restore 2 Hit Points.
Treat
- Phase
- Shipboard
During Starship Combat, the Medic must undergo a Medical Challenge to treat a crewmember's Injuries.
Sensors Standard Actions
The Sensor Operator's Actions are important as they can often mean the difference between a hit and a miss.
Acquire Target
- Phase
- Shipboard
The Sensor Operator can perform the Acquire Target action, which is their Scanners (Targeting) roll, plus any bonuses that the ship's computer provides. The target must also be within the ship's Sensor Range for this to work. The defending ship can use their Default Defense or an Active Defense. If there are any uncanceled Hits, the Sensor Operator achieves a Target Lock and assigns a Target Lock token pair to the ship they have locked onto.
Active Scan
- Phase
- Shipboard
A Sensor Operator can perform the Active Scan Action to sweep the surrounding space to find important things. This could be a cloaked or obscured ship, a beacon they've been tracking, or the details of a target ship, such as it's Shields, Hull, System Damage Taken and Weapons status.
Weapon Standard Actions
The Gunner has only two Actions they can perform, aiming and firing a weapon. However, these two are obviously critical Actions during combat.
Aim Action
- Phase
- Shipboard
A gunner can use the Aim Action during the Shipboard Phase. If they do, they can reroll 1 die during an Attack.
Fire Weapon
- Phase
- Weapons
A gunner must use an Action to use a Weapon to make an Attack. To do this they make a dice pool with the specific Weapon's Damage, plus their Deftness (if they are Proficient).
The defending ship rolls their Default Defense, or if they spent a Motivation or took the Dodge Action, they can perform an Active Defense equal to their Dodge score.
Free Actions
Free Actions are all the things that you can do on a Starship as part of your turn without using a valuable Action.
Switch Ship Stations
As a Free Action, a character can switch Ship Stations once per Turn, provided that both Ship Station Consoles are within the same room of the ship (i.e. you can't switch from Helm to Engineering if the Engineering console is in a different part of the ship.
This allows a character to perform their two Standard Actions on two different Ship Stations (such as Comms and Sensors, or Helm and Command).
Communicate Inside the Ship
It's a Free Action to communicate with other characters inside of a single ship. This could be shouting down the corridor, or using an intercom system. If the ship is larger than a Light Freightor (Size Category 5+), this is considered a Comms Standard Action instead.
Communicate Between Ships
Characters are free to communicate with other ships in Close Range as a Free Action, however these communications are limited to 25 words or less and can be jammed by enemy ships in the same Range Band.
Other Free Actions
Anything that is considered a Free Action during Interpersonal Combat is also a Free Action during Starship Combat. This includes things like pushing a button, flipping a switch or dropping an item.
Attacking
Most attacks are performed from the ship’s Weapons Station. Starfighters and some light freighters have Weapons Systems that can be fired by the pilot. Larger ships often have dedicated Weapons Stations that are by turrets or banks of weaponry.
The Weapon Systems can be boosted by additional Power Tokens granted to them by the Engineering Station. These tokens can add dice to the attack dice pools for Beam Weapons.
The To-Hit modifiers for the various weapons listed below are all affected by Distance. Targets in Close Range give the attacker +1 attack dice. Targets at Medium or further away give bonus defense dice to the defending ship.
- Weapon Attack
- Weapon Damage + (Deftness, if Proficient) + Range Bonus + Bonus Power
To-Hit Distance Penalty
|
Range Band |
Attacker Modifier |
Defender Modifier |
|
Collision |
0 |
0 |
|
Close |
+1 |
0 |
|
Short |
0 |
0 |
|
Medium |
0 |
+1 |
|
Long |
0 |
+3 |
|
Extreme |
N/A |
N/A |
Beam Attacks
Beam Weapons can be fired at any distance and can be boosted by Power Tokens.
- Beam Weapon Attack
- Beam Weapon Damage + (Deftness, if Proficient) + Range Bonus + Bonus Power
Missile & Torpedo Attacks
Missiles and Torpedoes are essentially the same kind of thing: a self propelled explosive.
- Missile / Torpedo Weapon Attack
- Missile / Torpedo Weapon Damage + (Deftness, if Proficient)
Mines
Mines are dropped by a ship as it flies past. Any ship that enters into Close Range with the mine will set it off, causing it to activate and potentially damage all ships within Close Range (Range tool 1).
- Mine Attack
- Mine Weapon Damage + (Intelligence, if Proficient)
Ramming
The Helm may decide that their hull and shields are stronger than an opponent in Close Range and attempt to Ram it. The Pilot rolls their Deftness + Piloting skill against the target’s Passive Defense, and if it’s a success, both ships take 1 damage die per speed increment that the larger ship’s maneuver dial was set to. Both ships also roll their defense dice against this attack.
The Ramming Ship can convert Focus Results into either more Damage to the opposing ship or more Evasion for their own defense. The ship being rammed can only use Focus to reduce damage.
- Ramming Attack
- Pilot's Skill vs target's Default Defense.
- Ramming Damage
- Ship Speed + Size Category Bonus
Tractor Beams
A Weapon’s Station can roll a ship’s Tractor Beam as a type of attack during or after combat. The roll is Deftness + Beam Weapons, but instead of damage, this becomes a Contested roll against the defending ship’s Passive or Active Defense. If the attacking ship wins, for each uncancelled Hit, the target ship gains 1 Tractor Beam Token.
- Tractor Beam Weapon Attack
- Tractor Beam Weapon + (Deftness, if Proficient) + Range Bonus + Bonus Power
For each Tractor Beam Token that a ship has, its Movement is reduced by 1. If a ship's Movement Speed is reduce to zero, it can be pulled in towards the attacking ship.
Group Attacks
Fighters often fly in Formation, this allows them to bring a larger attack to bear against their enemies, but makes it harder to evade enemy attacks.
The Gamemaster can decide that a set of fighters is flying in Formation, and group them together. They fly as a unit and attack as a unit.
However, none of the ships in the Formation can use the Dodge Action, because there is no where for them to Dodge without potentially hitting one of their allies. If a ship does use the Dodge Action, it will first need to roll a Collision Check against all of the ships in its formation, and if any of the ships fail this check, they Collide and suffer damage dice equal to their last maneuver's Speed.
Player Character ships can also fly in formation. The players inform the GM that they are flying in formation before the Maneuvers are revealed, and which Player Ship is the lead ship. That player must still select a Maneuver and keep it face-down until reveal, but the allied ships flying in formation will move their ships within Close Range (1) of the lead ship.
Like NPC ships, these PC ships cannot use the Dodge Maneuver unless they want to risk causing a cascading collision within their formation.
Defending
Ships have a few defenses they can employ to defend themselves from attacks.
Passive Defense
The Passive Defense is always available. It uses the Green Defense Dice and is rolled against any and all attacks that an attacker makes.
- Passive Defense
- Armor Rating +- Maneuverability
Passive Defense can benefit from both Evade and Focus.
Evade
A Pilot can take the Evade Action, gaining an Evasion Token. They can spend this during an attack to cancel out 1 Hit.
Focus
The Pilot can spend 1 Motivation and take the Focus Action, allowing them to convert all Focus Results on a single Defense roll to be converted into Evades.
Dodge
A Pilot uses an Action and spends 1 Motivation to perform a Dodge as a Reaction. Then during an opponent’s Weapon’s Phase, the Pilot can use their ship’s Dodge rating instead of their Passive Defense.
- Dodge
- Pilot (skill) + Default Defense
This Dodge defense can also benefit from an Evade and/or a Focus token.
Reactions
There are a set of Reactions that are always available. Most of the time the crew member must spend a Motivation to activate the Reaction.
Focus
The pilot or gunner can spend 1 Motivation to take the Focus Action, this allows them to use Focus Results as either Hits (in the case of an attack) or Evades (in the case of a defense).
Dodge
The pilot can spend 1 Motivation to take the Dodge Action, this allows them to roll their Dodge total instead of just their Passive Defense.
- Dodge
- Pilot (skill) + Default Defense
Damage Shunting
The Engineer can roll their Mechanics (power systems) when their ship sustains a Critical Hit (i.e. not canceled by an Evade) against the total number of Crits Sustained. If they get a number of Hits that is equal to or greater than the current Crits Sustained, the ship does not gain System Damage.
- Damage Shunting
- Mechanics + Power Generation
Special Moves
These are Starship Special Moves available via the Ace or Scoundrel classes.
Attacks
These are the Attack Special Moves.
Clip [Ace]
The Ace can spend 1 Motivation to ram their ship into their opponent’s.
Evasive Shot [Ace]
As an Action, the Ace can spend 1 Motivation to both attack and change their ship’s placement by 1 square / hex / inch.
Helix Shot [Ace]
As an Action, the Ace can spend 1 Motivation to fire their weapons as they perform a spiraling dive.
Lucky Hit [Scoundrel]
If the Scoundrel is piloting a starship and a target is within their Bullseye Arc, they can spend 3 Motivation and perform a Weapon Attack with the ship’s weapon. If the attack would hit (gets at least 1 Uncanceled Hit), it does 3x damage to the target.
Defenses
These are the Defense Special Moves.
Cargo Drop [Scoundrel]
If the Scoundrel is piloting a starship and their ship is facing away from an attacker that has them in their Forward Firing Arc, they can spend 1 Motivation and use a Shipboard Action. They open their ship’s cargo doors and drop worthless cargo behind them, granting their ship +4 defense dice for the rest of the Round.
Counter Shot [Ace]
As a Reaction, the Ace can spend 1 Motivation to fire their ship’s weapons, with +2 bonus dice, to destroy an incoming Missile attack. This is a Contested Roll versus the attacker’s, but the Ace must exceed the attacker’s number of Hits by at least 1 to destroy the missiles (or torpedoes).
Keep it Together [Ace]
As a Reaction, the Ace can spend 1 Motivation to maneuver their ship as it is struck so that the blow hits the toughest spot. This converts 1 of the attacker’s Critical Hits into a normal Hit.
Vehicular Evasion [Ace]
As a Reaction, the Ace can spend 1 Motivation to quickly maneuver their ship to avoid a hit. This allows them to roll their Dodge +2 bonus dice (green defense dice) against the attacker’s roll.
Damage and Repair
This section describes the different types of damage that ships can suffer from during combat, how to resolve this damage, and how ship repair works.
Standard Damage
Starship Combat Attacks cause damage to ships, and sometimes to passengers and crew within. Most Damage applies directly to a ship’s Shields or Hull. This is considered “Standard” Damage.
Any Hits or Critical Hits rolled on the Attack Dice that aren’t canceled by Evasions are counted as Damage against the targeted ship. That ship first depletes 1 Shield token per Damage, with additional Damage applying to that ship’s Hull. A ship that has taken Damage equal to or exceeding their Hull Points value suffers a Hull Breach.
Normal Hits must be all canceled before Critical Hits are.
Shields
Shields act as partly replenishable protection. They are the first to be depleted in the case of an attack that hits and does Damage for which the ship was not able to Evade. Each Hit can be absorbed by 1 Shield, any additional damage applies to the ship’s Hull, reducing its Hull Points.
When a Shield absorbs a Hit, flip it from the active side (Blue) to the deactivate side (Red).
Shields can be refreshed by an Engineer applying a Power Token to it. Each Power Token can refresh 1 Shield Token up to the ship's Maximum Shield Rating. A ship can never have more Shields than its Shield Rating.
The refreshed shields behave the same as normal shields and will last until the next time the ship takes damage. The Engineer can continue to refresh the Shields using this Action until the ship has run out of spare Power Tokens that can be allocated to this action.
Hull Points
Ships have a certain amount of Hull Points. When a ship's Hull Points are reduced to zero, it suffers from a Hull Breach. A ship with a Hull Breach will typically seal off certain sections, but those in the breached area may be sucked into the vacuum of space!
Some ships have only 1 Hull Section and suffering a Hull Breach will destroy those ships.
For ships with multiple sections, sealing the affected part of the ship will replenish 20% of the ship’s Hull Points as Temporary Hull Points.
Structure Points
A ship reduced to zero Hull Points also suffers 1 damage to its Structure Points.
A ship with zero Structure Points will explode!
Special Damage
Ionic damage inflicts Stress on ships. Critical Hits that are not canceled cause “System Damage” to the ship. If a ship is reduced to zero Hull Points, it suffers a Hull Breach and Structural Damage.
Ionic Damage
Caused by Ionic Weapons, Ionic Damage is marked against a ship's Stress Taken. If Stress Taken exceeds a ship's System Durability, it suffers 1 System Damage. Hard Maneuvers and some special actions also inflicts Stress on a ship. A pilot can clear 1 Stress by performing an Easy Maneuver. An Engineer can spend an Action and a Power Token to roll Mechanics to clear Stress. Each Hit will reduce the Stress by 1. A Critical Hit can clear two Stress.
System Damage
System Damage reduces the effectiveness of the ship overall. Each Critical has a chance to inflict System Damage. If a ship suffers more Stress than it has System Durability, it will suffer System Damage. System Damage has various effects on a ship's system.
| Roll | System Damage | Effects |
|---|---|---|
| 1 | Artificial Gravity Surge | The ship's artificial gravity generator has been hit. The GM rolls a d6. On a 1-3, the gravity is increased, all characters aboard must make a Toughness + Resistance check to avoid taking 5 dice of Stress. On a 4-6, the gravity is decreased, all characters aboard must make an Agility + Acrobatics check to avoid drifting away from their controls. If they do drift away it will take 1 Round to get back to their station. |
| 2 | Comms Down | The ship's communications array has been damaged. The crew of this ship cannot communicate with any crews of other ships, except via broad visual phenomenon (like flying in a known pattern) until the Comms have been repaired. |
| 3 | Hyperdrive Offline | The ship's hyperdrive as been damaged, the ship cannot go into hyperspace until it is repaired. |
| 4 | Inertial Dampener Failure | The ship's Inertial Dampeners failed, causing those aboard to suffer from the effects of every maneuver. Whenever the ship performs a Hard Turn, all aboard must make an Acrobatics skill check with the difficulty being the Speed of the Turn. Characters that fail this check suffer 1 Stress for each Hit. |
| 5 | Life Support on Backup | The ship's life support system has been hit and is on whatever backup the ship has. This will cause all living creatures aboard to expire in five hours. This is not cumulative. |
| 6 | Power Fluctuations | The ship suffers from power fluctuations, which causes it to lose 1 Power Token or Shield Token. This system damage can be cumulative so long as the ship has either tokens remaining. |
| 7 | Power Fluctuations | The ship suffers from power fluctuations, which causes it to lose 1 Power Token or Shield Token. This system damage can be cumulative so long as the ship has either tokens remaining. |
| 8 | Reduced Maneuverability | The ship's engines or maneuvering thrusters have been damaged. The ship cannot perform Red maneuvers while in this state. This System Damage can be partially cumulative. The second time this occurs, the ship cannot perform White maneuvers. If this System Damage occurs a third time, the ship is dead in space and cannot move until the system is repaired. |
| 9 | Sensor Blind | The ship's sensors are damaged. The ship loses any Target Locks that it had, and it cannot obtain new Target Locks until this system is repaired. The ship also cannot perform Active or Passive Scans. |
| 10 | Weapons Malfunction | One of the vehicle's weapon systems has reduced functionality. It does 1 less die of weapon damage per times this System Damage occurs (cumulative). If a ship has more than one weapon system, this can affect multiple weapons. |
| 11 | Structural Damage | The ship takes damage to it's physical structure. If a ship's Structure Points are reduced to zero, it explodes. |
| 12 | Structural Damage | The ship takes damage to it's physical structure. If a ship's Structure Points are reduced to zero, it explodes. |
| 13 | Structural Damage | The ship takes damage to it's physical structure. If a ship's Structure Points are reduced to zero, it explodes. |
| 14 | Structural Damage | The ship takes damage to it's physical structure. If a ship's Structure Points are reduced to zero, it explodes. |
| 15 | Structural Damage | The ship takes damage to it's physical structure. If a ship's Structure Points are reduced to zero, it explodes. |
| 16 | Structural Damage | The ship takes damage to it's physical structure. If a ship's Structure Points are reduced to zero, it explodes. |
| 17 | Structural Damage | The ship takes damage to it's physical structure. If a ship's Structure Points are reduced to zero, it explodes. |
| 18 | Structural Damage | The ship takes damage to it's physical structure. If a ship's Structure Points are reduced to zero, it explodes. |
| 19 | Structural Damage | The ship takes damage to it's physical structure. If a ship's Structure Points are reduced to zero, it explodes. |
| 20 | Structural Damage | The ship takes damage to it's physical structure. If a ship's Structure Points are reduced to zero, it explodes. |
Structural Damage
If a ship takes Structural Damage in excess of its Structure Points, it will explode. For dramatic purposes each crew member onboard gets 1 Shipboard Round to reach the Escape Pods before the ship explodes.
Repair
Ships engaging in combat will likely need repairs. Some repairs can be performed in space by an onboard Engineer, but major repairs may need to be done at a spaceport or space station.
Repairing Hull Points
The Engineer's Mechanics skill can be used to restore Hull Points. This is a Deftness + Mechanics skill roll. The Action Score Total is the amount of Hull Points that are restored.
Repairing System Damage
System Damage is more pervasive and difficult to repair compared to Hull Damage. During combat an Engineer must succeed at an Engineering Challenge with the difficulty of the challenge equal to the amount of System Damage sustained. If the Engineer succeeds in this challenge, then System Damage is temporarily repaired.
Outside of combat repairing System Damage is done with a simple Mechanics roll. The Engineer rolls their Mechanics with the difficulty being the amount of System Damage sustained. If they succeed on this roll, the system damage is repaired. Consult the tables below for the amount of time and spare parts this requires.
Repairing Structure Damage
Structure Damage is the hardest to repair and must take place in a spaceport or drydock. This takes 1 day per Structure Point repaired. The cost and parts for this repair are also included in the tables below.
Repair Costs
This section describes the costs for 3rd parties to repair ships. Even if the party has an Engineer that can do all the repairs, they will still incur some costs for replacement parts.
Hull Points
Fixing Hull Points amounts to a mechanic simply pounding metal back into the appropriate shape, with a few patches here and there. The cost is essentially just labor (though some places in the galaxy will still charge for "parts".
It takes about 1/2 hour per Hull Point for a proper repair.
| Hull Points | Repair Time | Labor Cost |
|---|---|---|
| 1 | 30 minutes | 25 |
| 2 | 1 hour | 50 |
| 3 | 90 minutes | 75 |
| 4 | 2 hours | 100 |
| 5 | 3 hours | 150 |
| 6 | 4 hours | 200 |
| 7 | 5 hours | 250 |
| 8 | 6 hours | 300 |
| 9 | 7 hours | 350 |
| 10 | 8 hours | 400 |
| 11 | 9 hours | 500 |
| 12 | 10 hours | 600 |
| 13 | 11 hours | 700 |
| 14 | 12 hours | 800 |
| 15 | 13 hours | 900 |
| 16 | 14 hours | 1000 |
| 17 | 15 hours | 2000 |
| 18 | 16 hours | 3000 |
| 19 | 17 hours | 4000 |
| 20 | 18 hours | 6000 |
System Damage
To repair System Damage is similar, though the costs essentially double for each level of System Damage. This makes it so that it’s typically cheaper to have a PC Engineer perform system repairs, rather than a repair shop. However an Engineer will still need to pay for parts, which is assumed to be the “Excellent” reputability modifier in terms of cost. The Labor cost is higher because you need a specialist instead of a generalist.
System Damage Repair Table
|
System Damage |
Parts Cost |
Repair Time |
Labor Cost |
|---|---|---|---|
|
1 |
250 |
1 Hour |
100 |
|
2 |
500 |
2 Hours |
200 |
|
3 |
1,000 |
4 Hours |
500 |
|
4 |
2,500 |
8 Hours |
1000 |
|
5 |
5,000 |
16 Hours |
2,000 |
|
6 |
10,000 |
32 Hours |
5,000 |
Structure Damage
Repairing Structural Damage requires a certain amount of credits per Structure Point and is also dependent on where in the galaxy the ship repair bay is and is modified by how reputable and honest the repair dealer is.
The time takes 1 day per 1 hull point to repair. And there is a 50 credit labor cost per hour (modified by Reputability or Disposition).
Player Characters cannot perform Structural Repairs themselves unless they have access to a drydock and Starship Hull Repair tools.
Structure Repair Costs
|
Structure Points to Repair |
Mid Rim |
Core Worlds |
Outer Rim |
Unknown Regions |
Parts Only |
|---|---|---|---|---|---|
|
1 |
250 |
350 |
500 |
1000 |
100 |
|
2 |
500 |
700 |
1000 |
2000 |
250 |
|
3 |
1000 |
1500 |
2000 |
5,000 |
500 |
|
4 |
1500 |
2000 |
5,000 |
10,000 |
750 |
|
5 |
2000 |
3000 |
7,500 |
20,000 |
1000 |
|
6 |
3000 |
5,000 |
15,000 |
40,000 |
1500 |
Reputability or Disposition
|
Disposition |
Reputability |
Cost Modifier |
|
Loyal |
Excellent |
¼ |
|
Friendly |
Good |
1 |
|
Neutral |
Poor |
2x |
|
Antagonistic |
Terrible |
5x |
|
Hostile |
Crooked |
10x |
Ship Destruction & Escape Pods
Zero Hull Points
When a ship falls to Zero Hull Points, it suffers from a Hull Breach and takes 1 point of Structure Damage. Some ships don't have additional Hull Sections and are instead Destroyed.
Max Stress
If a ship suffers Stress equal to its System Durability, it suffers from 1 System Damage. Suffering more Stress while already at this maximum will inflict more System Damage.
System Damage
If a ship takes a lot of System Damage, it can become Disabled in various ways. Ships taking System Damage always have a chance to take Structure Damage instead.
Max Structure Damage
If a ship takes Structure Damage equal to its Structure Points, the ship will be Destroyed.
Jettisoning the Escape Pods
When a ship is heavily damaged, the Escape Pod doors on most ships automatically open. Once all occupants are inside and belted in, they can press a button to jettison the escape pod. Escape pods have limited maneuverability. Escape pods transmit a distress beacon, which can typically reach as far as the edge of a system.
Ship Attributes
This section details the attributes of starships.
Base Attributes
These are the base attributes of a ship, the things that are built in and not derived.
Armor Rating
This is the rating of the ship's Armor. Though ships can have their armor upgraded, all ships have a stock armor rating, although in some cases this can be zero.
Armor Rating is used together with Maneuverability to determine the ship's Passive Defense and subsequent Dodge value.
Stock Armor will have a rating from 0 to 5.
Cargo Capacity
The amount of cargo that the ship can carry in metric tons. Since this is a weight value, specific cargo must also be considered from a volume perspective.
Hull Points
This attribute describes the structure and durability of the ship's hull, the superstructure that lies beneath the armor.
Ships lose Hull Points when they take damage, and can be patched by an Engineer's Mechanics roll to be repaired.
If Hull Points are reduced to zero, the ship suffers from a Hull Breach and must be sealed before too much atmosphere is lost.
| Hull Points | Common Ship Type |
|---|---|
| 3 | A racing ship |
| 5 | An interceptor fighter |
| 5 | A space yacht |
| 7 | A standard fighter |
| 10 | A patrol ship |
| 13 | A light freighter |
| 15 | A bulk freighter |
| 20 | A light cruiser |
Maneuverability
Every ship has a Maneuverability rating from -3 to +3 and including zero.
The Maneuverability rating of a ship indicates how easy or difficult it is to handle.
This rating is used to calculate the ship's Passive Defense and Dodge rating.
It is also applied as a modifier to a pilot's Piloting Skill when the pilot is attempting unusual maneuvers.
| Maneuverability Score | Common Ship Type |
|---|---|
| -3 | A light cruiser |
| -3 | A bulk freighter |
| -2 | A light freighter |
| -1 | A patrol ship |
| 0 | A standard fighter |
| +1 | A space yacht |
| +2 | An interceptor fighter |
| +3 | A racing ship |
Power Generation
Though all ships generate power via an internal generator, this rating indicates how much excess power a ship is able to generate for emergencies. As such this rating can be from zero to 5.
Hard Points
All ships are customizable to a degree, though some are specifically built with customization in mind.
A ship's Hard Point rating indicates how many structural points the ship has to spare for additional equipment, weapons, shields and/or armor.
Hard Points range from 3 to 6
In addition a ship can have additional hard points added equal to its initial value. So a ship with 3 hard points could have 3 more added.
| Hard Points | Common Ship Type |
|---|---|
| 4 | A light cruiser |
| 6 | A bulk freighter |
| 6 | A light freighter |
| 4 | A patrol ship |
| 1 | A standard fighter |
| 2 | A space yacht |
| 0 | An interceptor fighter |
| 3 | A racing ship |
Size
Though ships come in all sizes, the kinds of ships that Player Characters will be interacting with come in a few standard sizes.
| Size Number | Example Ship | Standard Maneuverability Modifier |
|---|---|---|
| 1 | Probe | +3 |
| 2 | Escape Pod | +2 |
| 3 | Fighter | +1 |
| 4 | Light Freighter | 0 |
| 5 | Light Cruiser | -1 |
Speed
A ship's Speed Rating determines roughly how fast it can go using it's conventional drive during a dogfight situation.
This will be a number from 1 to 5.
Few ships that players characters typically use will have a Speed lower than 3.
This Speed value affects what Maneuvers the pilot can have the ship perform.
During combat if a ship's Speed is reduced to zero, it can be moved via a Tractor Beam.
Structure Points
A ship's Structure Points is an indication of how much Structural Damage a ship can take before it explodes. If a ship's Structure Points is reduced to zero, it will explode.
NPC Ship "Extras" will only have 1 Structure Point, whereas Player Character ships and Elite ships will always have 7 Structure Points.
System Durability
A ship's System Durability is an indication of how much Stress the ship can take before it suffers from System Damage. This Stress can be caused by the pilot using Maneuvers that the ship can't really handler. It can also be caused by Ionic Weapons.
If a ship suffers Stress equal to or exceeding its System Durability, that ship will then suffer 1 (random) System Damage.
Stock ships will have a System Durability of 5. Military ships such as fighters, gunships and light cruisers will have more System Durability.
Stress can be cleared via an Engineer's Mechanics roll.
Derived Attributes
These are the attributes that are derived from other values.
Passive Defense
A ship's Passive Defense is the default number of Defense Dice that are rolled. whenever the ship would be attacked or collided with and the pilot did not take the Dodge Action.
It is a combination of the ship's Armor Rating and its Maneuverability.
- Passive Defense
- Armor Rating +- Maneuverability
Dodge
A ship's Dodge score can be rolled when the ship's pilot (or copilot) executes the Dodge Action or Dodge Reaction. This score is a combination of the Pilot's Skill plus the ship's Passive Defense.
- Dodge
- Deftness + Piloting + Passive Defense
Optional Attributes
These attributes are not universal to every type of ship, though many of them are common across stock models.
Atmospheric Maneuverability
This is a separate Maneuverability rating for the ship traveling and maneuvering in an atmosphere. It is also a range from -3 to +3 and includes 0.
Communications Range
This is the range of the communications array. This has a value of one of the Range Bands (Close, Short, Medium, Long and Extreme).
If the ship is attempting to communicate with something else outside of its range, those communications still occur, but not instantaneously. Usually the message will be received on the following turn.
Hyperdrive Rating
The rating of the ship's Hyperdrive if it has one. This rating is the multiplier in time on how long it would take to travel between systems of a given length. Most ships have a backup hyperdrive which is typically much slower than their main drive, but still faster than using conventional engines to cross the vast distances of space.
Common Drive Ratings: TODO
Medical Equipment Bonus
If the ship's medical bay is well stocked it may provide a bonus to rolls made to treat within it.
Navigation Computer
Most ships that have hyperdrives also have Navigation Computers. These aid the pilot in making a Navigation roll for Astrogation between systems or jump points. If the ship has a navigation computer, this attribute represents the bonus dice added to that roll.
Sensor Range
The Range Band that the ship's sensors can actively scan. Outside of this range data is still received, but not in real-time. This means that a scan will not return data for at least one more turn.
Sensor Computer Assistance
If the ship's computer can provide scanning assistance, then the Sensor Operator gains this bonus to their Perception + Sensors roll (or Perception + Scanners(Targeting)).
Shield Rating
If the ship has defensive shields, this attribute represents the number of Shield Tokens that it receives at the start of combat. These defensive shields will be reduced before the Hull of the ship is damaged (damage to Hull Points).
Shield Rating can be upgraded, but on most ships it goes from 0 to 5.
Weapon Attributes
Weapons have a few attributes which differentiate them.
Name: The name of the weapon.
Weapon Skill: Which weapon skill the weapon uses (Beam Weapons, Missile Weapons, Mines or an exotic weapon type).
Firing Arc: The area of the ship that the weapon fires from (Fore, Aft, Port, Starboard, Dorsal, Ventral, Forward, Rear, All)
Damage Type: The type of damage this weapon inflicts. This is primarily to distinguish between normal damage and Ionic damage which inflicts Stress on a ship.
Weapon Damage: The number of dice the weapon adds to an attack.
Qualities: Any special weapon qualities this weapon possesses. See Ship Weapon Qualities below.
Range: The range of the weapon. Most weapon ranges will be given in numbers (1-3) or names (Close, Medium or Long).
Rarity: How rare the weapon is to find and whether it is restricted.
Hard Points Required: How many Hard Points on the ship this weapon takes up.
Cost: How much the weapon typically costs, though this value can be higher or lower depending on where in the galaxy it's being purchased from.
Advanced Starship Combat
This section contains the advanced starship combat rules.
Surprise Attacks
If one side is completely unaware of the other side when combat is initiated, a Surprise Attack occurs.
During a Surprise Attack, those that are Surprised must lock in whatever Maneuver they were planning to do before they were surprised. In addition, they can only attack on the Weapon Phase if an enemy target is within their Bullseye Arc (or one of the Bullseye Arcs of the ship, if it has multiple gunners).
When a Surprised Ship is the target of an attack, it can only roll Armor or Passive Defense, whichever is lower to avoid the attack.
- Armor Only Defense
- Armor Rating or Passive Defense, whichever is lower.
Obviously Shields and other automatic defenses still work for the defending Surprised ship.
After a full Surprise Round, the crews of all ships that were Surprised can act normally and the Surprise Attack ends.
Capturing Ships
A starship can be captured with a combination of Ionic damage to it and a Tractor Beam to tow it into range for a clamp.
Step 1. Disable the Ship
To aid in the capture of a ship, the capturing force should to attack it with Ionic weapons, perhaps specificially targetting its engines and maneuvering thrusters. Once the ship's Maneuverability has been reduced, it can be tractored more easily. If there is no Engineer or Astromech onboard, the ship will remain with disabled Maneuverability
A ship with completely disabled Maneuverability will drift with whatever velocity it had last in the same direction.
Step 2. Tractor the Ship
If a ship that is Disabled is Tractored, it loses its former velocity and becomes stationary at the point it was Tractored.
- Tractor Beam Attack
- Tractor Beam Damage + (Deftness, if Proficient) + Range Bonus + Bonus Power
Each Hit of a Tractor Beam weapon inflicts a Tractor Token. Each Tractor Token reduces the ship's Speed by 1. If a ship's Speed is reduced to 0, it can be pulled or pushed by 1 square/hex/inch in any direction.
Step 3. Clamp the Ship
If a Speed zero ship is Tractored to the point that it is adjacent to the tractoring ship, and the tractoring ship is 1 size larger than the target Disabled ship, it can be “Clamped” if the ship has such a device. The Pilot or Gunner can roll their Deftness and must get at least 1 Hit in order to successfully clamp the ship.
Ling-of-Sight
A ship has Line-of-Sight to a target if it can draw one uninterrupted line from one point of the ship base (or occupied squares/hexes) to one point of the target ship.
Several things can intterupt this line of sight. Common ones are:
- Other Ships
- Debris Fields
- Asteroids
- Gas Clouds
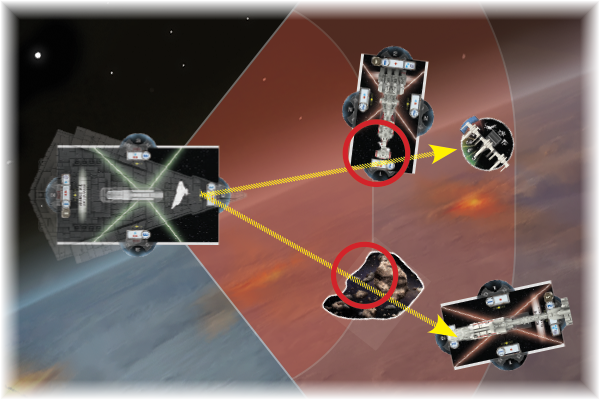
In addition, a ship can only attack another ship if the line-of-sight extends from one of their Attack Arcs.
Attack Range
Different weapons have different attack ranges. These ranges can be given in either Range Bands or numerically from 1 to 3:
| Range Band(s) | Range Number |
|---|---|
| Collision/Close | 1 |
| Short | 2 |
| Medium | 3 |
If a target is 1 Range Band outside of the range, the gunner can still attack it, but the defender gets an extra Defense Die.
Targets outside of 2 Range Bands of the weapon's range cannot be attacked.
Area Of Effect Attacks
Some ship weapons do damage in an Area of Effect instead of against a single ship.
Broadly speaking there are only two types of AOE shapes in starship combat:
- A Line
- A Circle
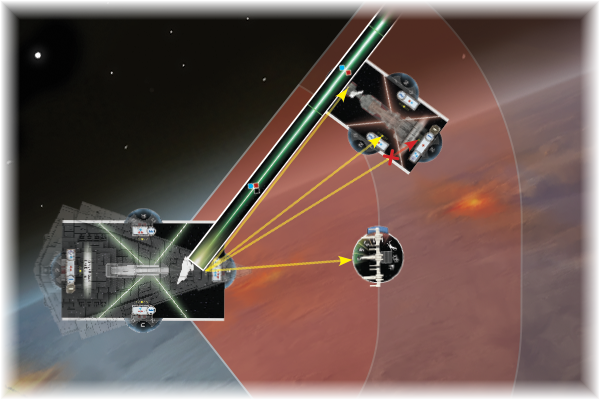
AOE Lines
Very powerful Beam Weapons can ignore the Line-of-Sight rules and hit every target in a line. To determine if a target is hit, use the Line-of-Sight rules but ignore obstructions up to the range of the weapon.
Typically these powerful weapons are mounted on Capital Ships.
AOE Circles
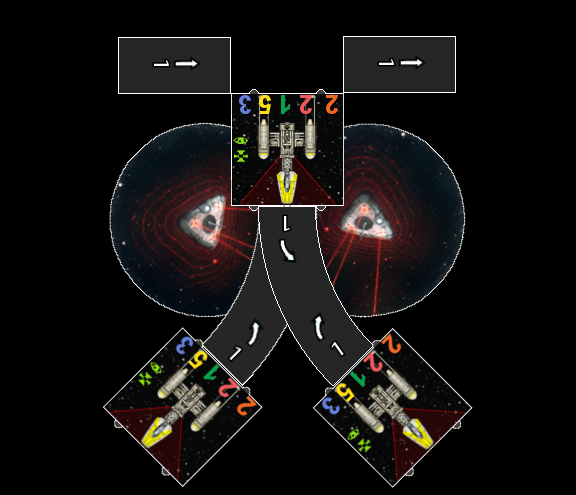
There are several weapon types that do damage in a radius around the point of impact or deployment.
Missiles, torpedoes, mines and bombs are all examples of weapons with a blast radius.
Typically this radius will be all of Range 1 (Collision/Close) from the point of impact/deployment.
Allied Ships
If there are NPC ships that are allied with the Player Characters, those ships should be able to engage in combat without overshadowing the PC ships. This utilizes a similar mechanism to Ally functionality in Interpersonal Combat.
These Allied Ships will have an Attack Die total and a Defense Die total. These numbers are compared against enemy ships to determine if they do damage.
Allied Ships Attacking
When an Allied Ship attacks an enemy NPC ship, the Gamemaster compares the Allied Ship's Attack Die total against the Default Defense of the defending ship. The GM subtracts the target's Default Defense from the Allied Ship's Attack Die number and the Allied Ship does 1 point of damage for each point of difference between the two.
Example: Luke Skywalker's X-Wing has an Attack Die total of 5. A defending TIE fighter has a Default Defense of 3. That means when Luke Skywalker attacks the TIE fighter, he does 2 damage to it.
Allied Ships cannot inflict Critical Hits.
Allied Ships Defending
When an Allied Ship is attacked by an enemy NPC ship, the Gamemaster compares the attacking enemy's ship's Weapon Attack total with the Allied Ship's Defense Die number. If the attack number is greater, the Allied Ship takes 1 point of damage for each point of difference between the Attack and Defense.
This means that Allied Ships cannot suffer from Critical Hits.
Example: A TIE Fighter attacks Luke Skywalker's X-Wing. The TIE Figther has a Primary Weapon of 2 and Luke's X-Wing has a Defense Die number of 3, so Luke evades the attack.
If Allies have a strong defense, this will mean that they do not suffer much damage in combat, except if they are attacked by a strong enemy or a Wing of multiple enemies flying in Formation.